
算法复杂度
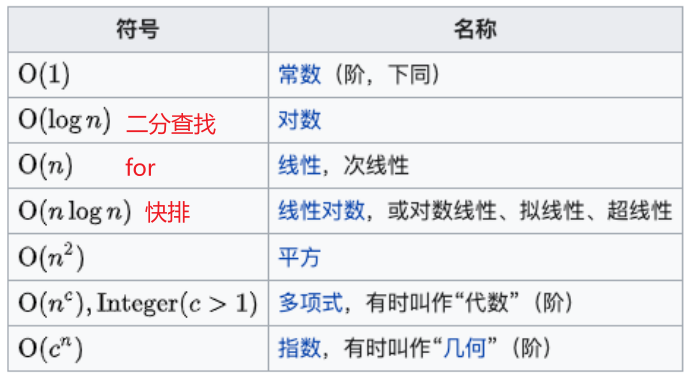
时间复杂度(常见的对数阶)
空间复杂度
对于一个简单的递归算法来说,每次调用都会在内存中分配新的栈帧,这些栈帧占用了额外的空间。
- 因此,该算法(例如反转链表的递归调用)的空间复杂度是O(n),其中n是递归深度
而对于迭代算法来说,在每次迭代中不需要分配额外的空间,因此其空间复杂度为O(1)
在平时进行算法优化时,我们通常会进行如下的考虑:
使用尽量少的空间(优化空间复杂度);
使用尽量少的时间(优化时间复杂度);
特定情况下:使用空间换时间或使用时间换空间;
数组
略
栈结构的实现(数组方式、链表方式)
// 数组方式实现
export class ArrayStack<T> {
  private array: T[] = []

  push(element: T): void {
    this.array.push(element)
  }

  pop(): T | undefined {
    return this.array.pop()
  }

  peek(): T | undefined {
    return this.array[this.array.length - 1]
  }

  isEmpty(): boolean {
    return this.array.length === 0
  }

  size(): number {
    return this.array.length
  }
}
链表的实现
class Node<T> {
  value: T

  next: Node<T> | null = null

  constructor(value: T) {
    this.value = value
  }
}

class LinkedList<T> {
  private head: Node<T> | null = null
  private size: number = 0

  get length() {
    return this.size
  }

  // 私有方法,根据position获取链表节点
  private getNode(position: number) {
    let index = 0
    let current = this.head
    while (index++ < position) {
      current = current?.next ?? null
    }
    return current
  }

  // 添加链表元素
  append(value: T) {
    const newNode = new Node(value)

    if (!this.head) {
      this.head = newNode
    } else {
      let p = this.head
      while (p.next) {
        p = p.next
      }
      p.next = newNode
    }

    this.size++
  }

  // 遍历链表的方法
  traverse() {
    const values: T[] = []

    let current = this.head
    while (current) {
      values.push(current.value)
      current = current.next
    }

    console.log(values.join(' -> '))
  }

  // 插入节点
  insert(position: number, value: T) {
    if (position < 0 || position > this.size) { throw new Error('position越界') }
    const newNode = new Node(value)
    // 头部插入
    if (position === 0) {
      newNode.next = this.head
      this.head = newNode
    } else { // 非头部插入
      let previous = this.getNode(position - 1)
      newNode.next = previous!.next
      previous!.next = newNode
    }
    this.size++
  }

  // 移除节点
  removeAt(position: number): T | null {
    if (position < 0 || position > this.size - 1) { throw new Error('position越界') }

    let value: T | null = null
    if (position === 0) {
      value = this.head!.value
      this.head = this.head!.next
      // this.head = this.head?.next ?? null 三目运算简写
    } else {
      let previous = this.getNode(position - 1)
      value = previous!.next!.value
      previous!.next = previous!.next!.next
    }

    this.size--
    return value
  }

  // 根据下标获取元素值
  getValue(position: number): T | null {
    if (position < 0 || position >= this.size) {
      throw new Error('position越界')
    }
    let current = this.getNode(position)
    return current?.value ?? null
  }

  // 修改某个节点值
  update(position: number, value: T) {
    if (position < 0 || position >= this.size) {
      throw new Error('position越界')
    }
    let current = this.getNode(position)
    current!.value = value
    return true
  }

  // indexOf实现
  indexOf(value: T): number {
    let current = this.head
    if (!current) { return -1 }
    let index = 0
    while (index < this.size) {
      console.log(index)
      if (current!.value === value) {
        return index
      } else {
        current = current!.next
      }
      index++
    }

    return -1
  }

  // 根据value删除
  remove(value: T): boolean {
    let index = this.indexOf(value)
    return this.removeAt(index) ? true : false
  }

  // 为空判断
  isEmpty(): boolean {
    return this.size > 0 ? false : true
  }
}
哈希表
哈希表通常是基于数组进行实现的,但是相对于数组,它也很多的优势:
它可以提供非常快速的插入-修改-删除-查找操作;
无论多少数据,插入和删除值都接近常量的时间:即O(1)的时间复杂度。实际上,只需要几个机器指令即可完成;
哈希表的速度比树还要快,基本可以瞬间查找到想要的元素;
哈希表相对于树来说编码要容易很多;
它的结构就是数组,但是它神奇的地方在于对数组下标值的一种变换,这种变换我们可以使用哈希函数,通过哈希函数可以获取到HashCode(索引值),再通过HashCode(索引值)在数组中查找数据O(1)。
哈希表相对于数组的一些不足:
哈希表中的数据是没有顺序的,所以不能以一种固定的方式(比如从小到大)来遍历其中的元素(没有特殊处理情况下)。
通常情况下,哈希表中的key是不允许重复的,不能放置相同的key,用于保存不同的元素。
哈希函数( 字符(key) 通过哈希函数转成=> HashCode(索引) )
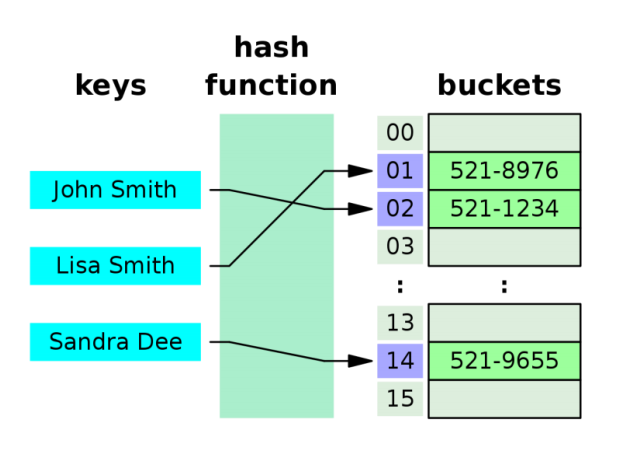
字符 => 幂的连乘 => 大数字 => 哈希化 => 索引值 => 存储/查询/
认识情况了上面的内容,相信你应该懂了哈希表的原理了,我们来看看几个概念:
哈希化:将大数字转化成数组范围内下标(例如进行取余操作)的过程,我们就称之为哈希化。
哈希函数:通常我们会将单词转成大数字,大数字在进行哈希化的代码实现放在一个函数中,这个函数我们成为哈希函数。
哈希表:最终将数据插入到的这个数组,对整个结构的封装,我们就称之为是一个哈希表。
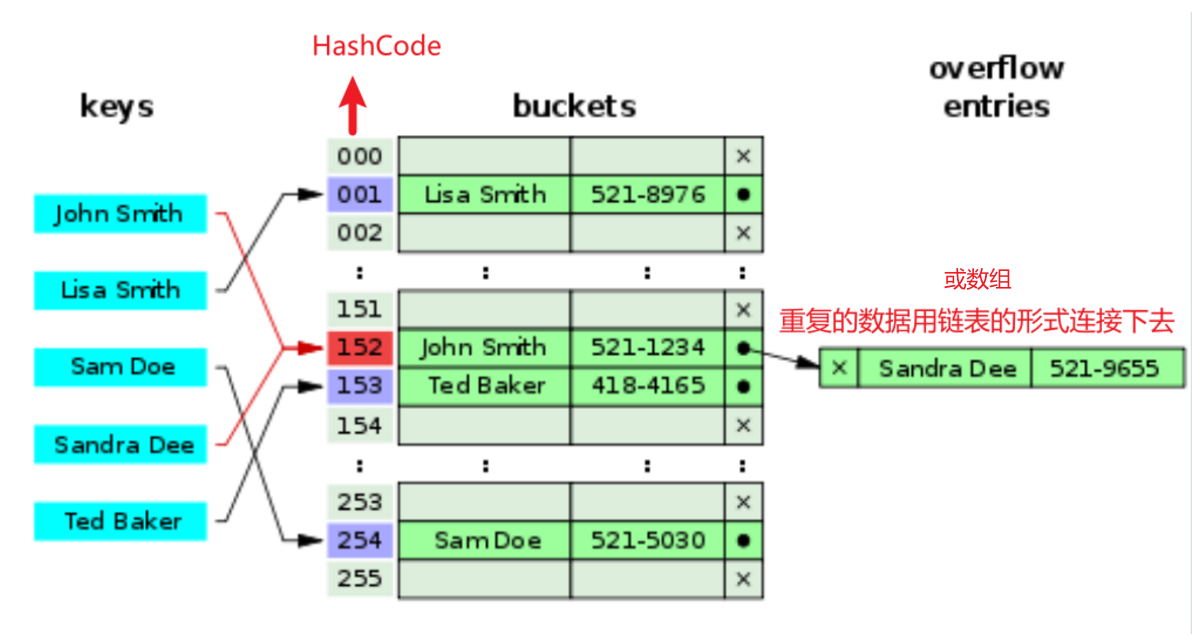
但是通过哈希化后的下标值依然可能会 重复,如何解决这种重复的问题呢?
下标冲突解决
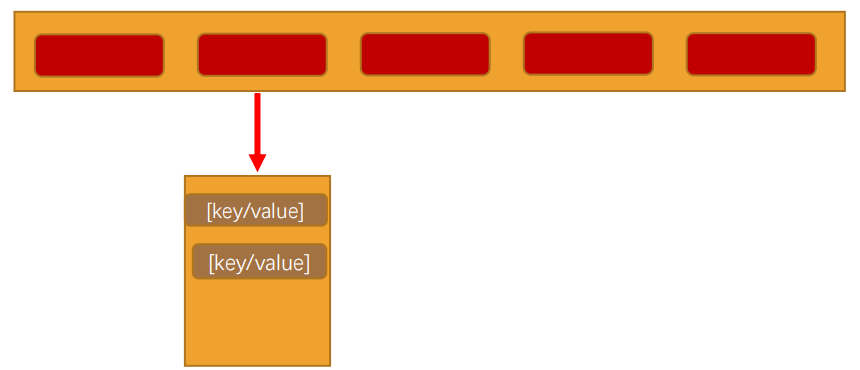
链地址法(如图) 重点图片!!!
链接的数据结构可以用链表、数组、红黑树等
填装因子
填装因子: 已存储元素项 / 哈希表目前总长度
所以填装因子越大,数据查找、存储效率会下降,就需要考虑扩容
开放地址法
主要工作方式是寻找空白的单元格来添加重复的数据
线性探测 步长为1,查找空白地址进行存储
二次探测 步长不为1,递增步长查找空白地址进行存储
再哈希 二次哈希进行存储 推荐的哈希函数: stepSize = constant - (key % constant)
哈希函数
好的哈希函数应该尽可能让计算的过程变得简单,提高计算的效率。
哈希表的主要优点是它的速度,所以在速度上不能满足,那么就达不到设计的目的了。
提高速度的一个办法就是让哈希函数中尽量少的有乘法和除法。因为它们的性能是比较低的。
设计好的哈希函数应该具备哪些优点呢?
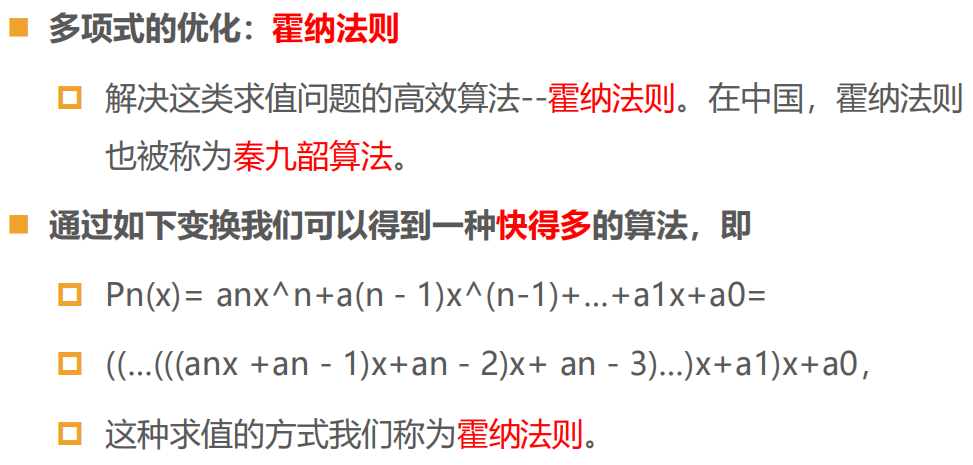
快速的计算(霍纳法则 -> 秦九韶算法) 多项式的优化算法
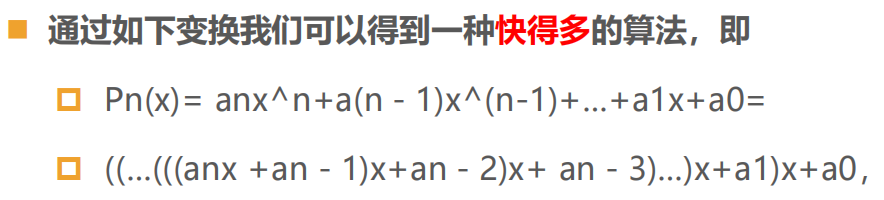
✓ 哈希表的优势就在于效率,所以快速获取到对应的hashCode非常重要。
✓ 我们需要通过快速的计算来获取到元素对应的hashCode
均匀的分布
✓ 哈希表中,无论是链地址法还是开放地址法,当多个元素映射到同一个位置的时候,都会影响效率。
✓ 所以,优秀的哈希函数应该尽可能将元素映射到不同的位置,让元素在哈希表中均匀的分布。
✓ 在使用常量的地方,尽量使用质数,质数和其他数相乘的结果相比于其他数字更容易产生唯一性的结果,减少哈希冲突。
✓ Java中的N次幂的底数选择的是31,是经过长期观察分布结果得出的;
/**
 * 哈希函数
 * @param key 要转换的key字符串
 * @param max 进行取余的值,数组的长度(推荐使用质数)
 * @returns hashCode索引值
 */
function hashFunc(key: string, max: number): number {
  // 1. 计算hashCode cats => 60337 (27为底)
  let hashCode = 0
  const length = key.length
  for (let i = 0; i < length; i++) {
    // 2. 霍纳法则计算hashCode
    hashCode = 31 * hashCode + key.charCodeAt(i)
  }

  // 3. 求出索引值
  const index = hashCode % max
  return index
}
哈希表实现
创建哈希表
哈希表的插入和修改操作put
由于一个哈希表的key值不允许重复,当哈希表中没有这个key时执行插入操作,当哈希表有相应的key时执行的是修改操作
哈希表扩容/缩容
- 一般当哈希表的填装因子大于0.75时考虑对哈希表进行扩容,填装因子小于0.25时考虑对哈希表进行缩容
- 扩容把数组长度变大/变小(扩容或缩容的容量大小建议为质数)后,还需要把数组内的所有数据拷贝,数组置空,将拷贝的数据(所有元组)以最新的数组长度进行二次哈希放入最新长度的数组中去(由于数组长度发生变化,扩容后后续所有操作获取的索引值均是以最新长度取模获得的,所以原来的所有元组数据均需进行二次哈希,重新放入哈希表内)
建议将哈希函数取模的值、数组容量长度均为质数,提高哈希表内各数据的分散的均匀
// 数组方式处理冲突
class HashTable<T = any> {
  // 创建一个数组,用来存放链地址法中的链(数组)
  storage: [string, T][][] = []
  // 定义数组的长度
  private length: number = 7
  // 定义已存放元组个数
  private count: number = 0

  // 哈希函数
  private hashFunc(key: string, max: number): number {
    // 1. 计算hashCode cats => 60337 (27为底)
    let hashCode = 0
    const length = key.length
    for (let i = 0; i < length; i++) {
      // 2. 霍纳法则计算hashCode 看上图理解多项式的变式 即为以下实现
      hashCode = 31 * hashCode + key.charCodeAt(i)
    }

    // 3. 取模求出索引值
    const index = hashCode % max
    return index
  }

  // 质数判断
  private isPrime(num: number): boolean {
    // 判断质数只要小于平方根范围内没有整除即可 以16为例进行测试 2x8 4x4截止
    const sqrt = Math.sqrt(num)

    for (let i = 2; i <= sqrt; i++) {
      if ((num / i) % 1 === 0) {
        return false
      }
    }

    return true
  }

  // 获取当前数的下一个质数
  private getNextPrime(num: number) {
    let isPrime = this.isPrime(num)
    while (!isPrime) {
      isPrime = this.isPrime(++num)
    }

    return num
  }

  // 扩容/缩容
  private resize(newLength: number) {
    // 获取当前数的下一个质数
    newLength = this.getNextPrime(newLength)

    // 改变数组大小
    this.length = newLength

    // 拷贝原来的数据,数组初始化
    const oldStorage = this.storage
    this.storage = []
    this.count = 0

    // 以最新的数组长度基础重新哈希,放入最新的数组里
    oldStorage.forEach(item => {
      if (!item) return
      for (let i = 0; i < item.length; i++) {
        const tuple = item[i]
        this.put(tuple[0], tuple[1])
      }
    })
  }

  // 更新/修改操作
  put(key: string, value: T) {
    // 获取到key对应的hashCode
    const index = this.hashFunc(key, this.length)

    // 根据index索引获取对应的链/数组
    let link = this.storage[index]

    // 链有值且key对应则更新,不对应则添加
    let hasKey = false
    if (link?.length) {
      for (let i = 0; i < link.length; i++) {
        const tuple = link[i] // 元组
        if (tuple[0] === key) { // 存在key则进行更新操作
          hasKey = true
          tuple[1] = value
        }
      }
    }

    if (!hasKey || !link) { // key不存在,添加新key
      !link ? this.storage[index] = [[key, value]] : link.push([key, value])
      this.count++

      // 装填因子 > 0.75? 扩容: ''
      if (this.count / this.length > 0.75) {
        this.resize(this.length * 2)
      }
    }
  }

  // 获取操作
  get(key: string): T | undefined {
    // 根据Key获取index
    const index = this.hashFunc(key, this.length)
    // 根据索引获取链
    const link = this.storage[index]

    if (!link) return undefined

    // 链中找元组
    for (let i = 0; i < link.length; i++) {
      const tuple = link[i]
      if (tuple[0] === key) {
        return tuple[1]
      }
    }

    return undefined
  }

  // 删除操作
  delete(key: string): T | undefined {
    // 根据key获取索引
    const index = this.hashFunc(key, this.length)

    // 根据索引获取相应的链
    let link = this.storage[index]

    if (!link) return undefined

    // 移除
    for (let i = 0; i < link.length; i++) {
      const tuple = link[i]
      if (tuple[0] === key) {
        const delTuple = link.splice(i, 1)[0][1]
        this.count--
        // 装填因子 < 0.25? 缩容: '' 最小容量为7
        if (this.count / this.length < 0.25 && Math.floor(this.length / 2) > 7) {
          this.resize(Math.floor(this.length / 2))
        }
        return delTuple
      }
    }

    return undefined
  }
}

const hashTable = new HashTable()
质数判断
/**
 * 判断数字是否是质数
 * @param num 整数
 * @returns boolean
 */
function isPrime(num: number): boolean {
  // 判断质数只要小于平方根范围内没有整除即可 以16为例进行测试 2x8 4x4截止
  const sqrt = Math.sqrt(num)

  for (let i = 2; i <= sqrt; i++) {
    if ((num / i) % 1 === 0) {
      return false
    }
  }

  return true
}
树
各数据结构优缺点比较

 )
树的术语
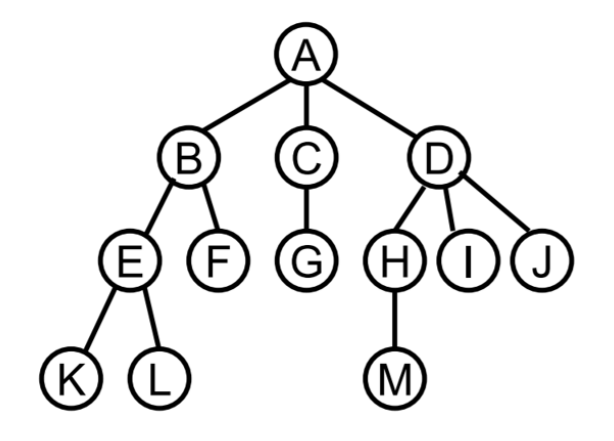
◼ 1.节点的度(Degree):节点的子树个数。
◼ 2.树的度 (MaxDegree) :一棵树的所有节点度中最大的度数。
◼ 3.叶节点(Leaf):度为0的节点。(也称为叶子节点)
◼ 4.父节点(Parent):有子树的节点是其子树的根节点的父节点
◼ 5.子节点(Child):若A节点是B节点的父节点,则称B节点是A节点的子节点;子节点也称孩子节点。
◼ 6.兄弟节点(Sibling):具有同一父节点的各节点彼此是兄弟节点。
◼ 7.路径和路径长度:从节点n1到nk的路径为一个节点序列n1 ,n2,… ,nk ,从父走到子
ni是 n(i+1)的父节点
路径所包含 边的个数 为路径的长度。
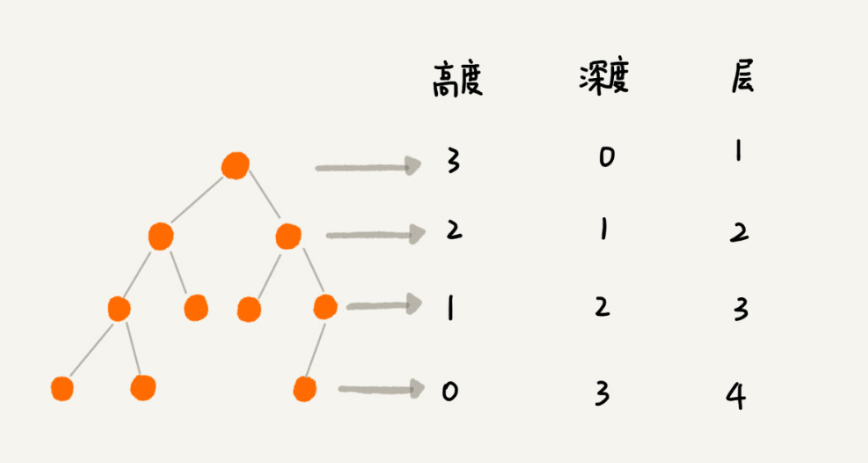
◼ 8.节点的层次(Level):规定根节点在1层,其它任一节点的层数是其父节点的层数加1。
◼ 9.树的深度(Depth):对于任意节点n, n的深度为从根到n的唯一路径长,根的深度为0。 从根节点开始
◼ 10.树的高度(Height):对于任意节点 n,n的高度为从n到一片树叶的最长路径长,所有树叶的高度为
0。 从当前子树开始算高度
普通表示法
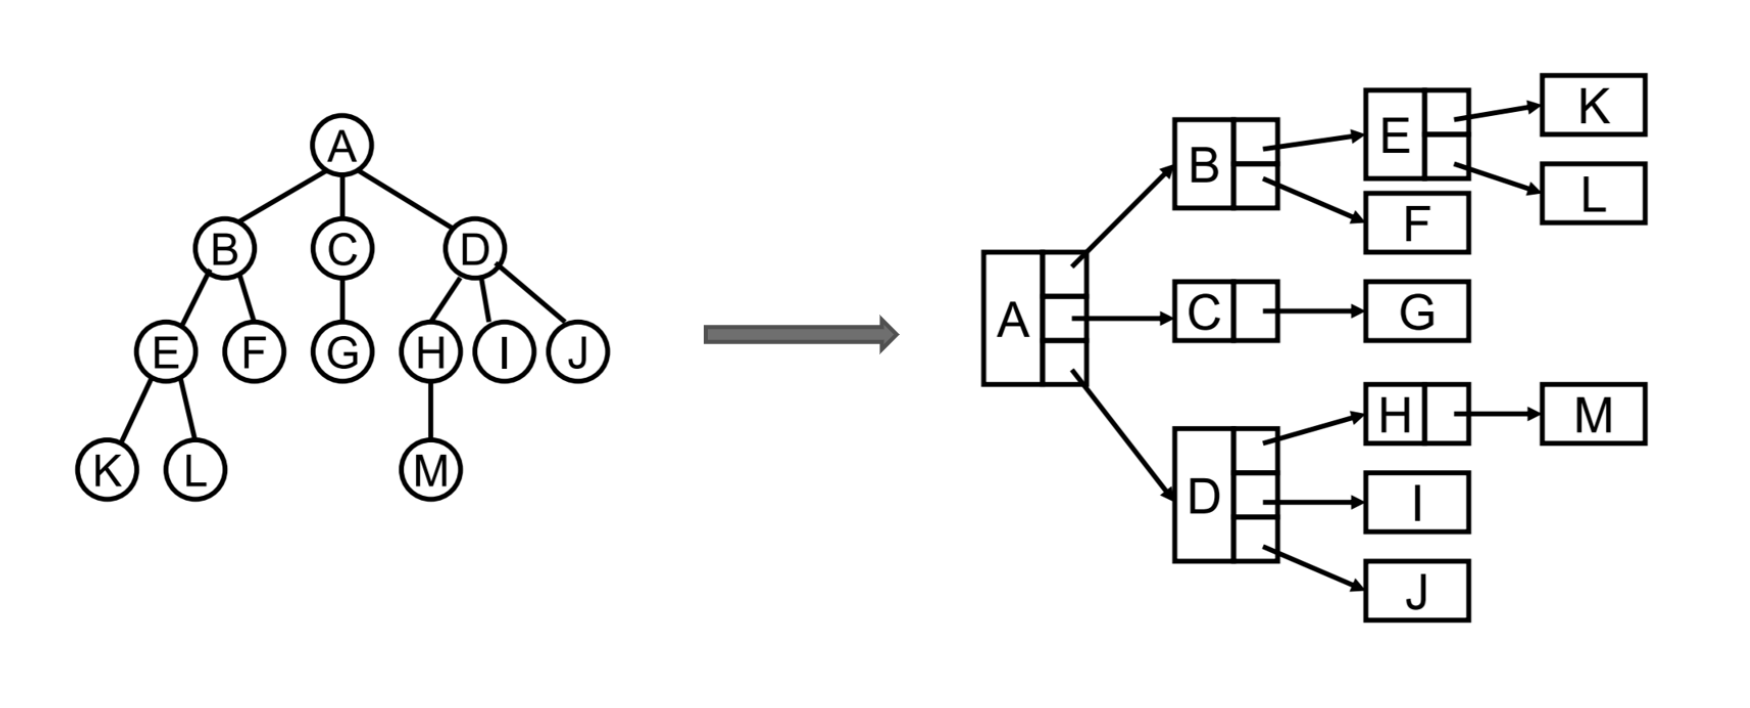
儿子兄弟表示法
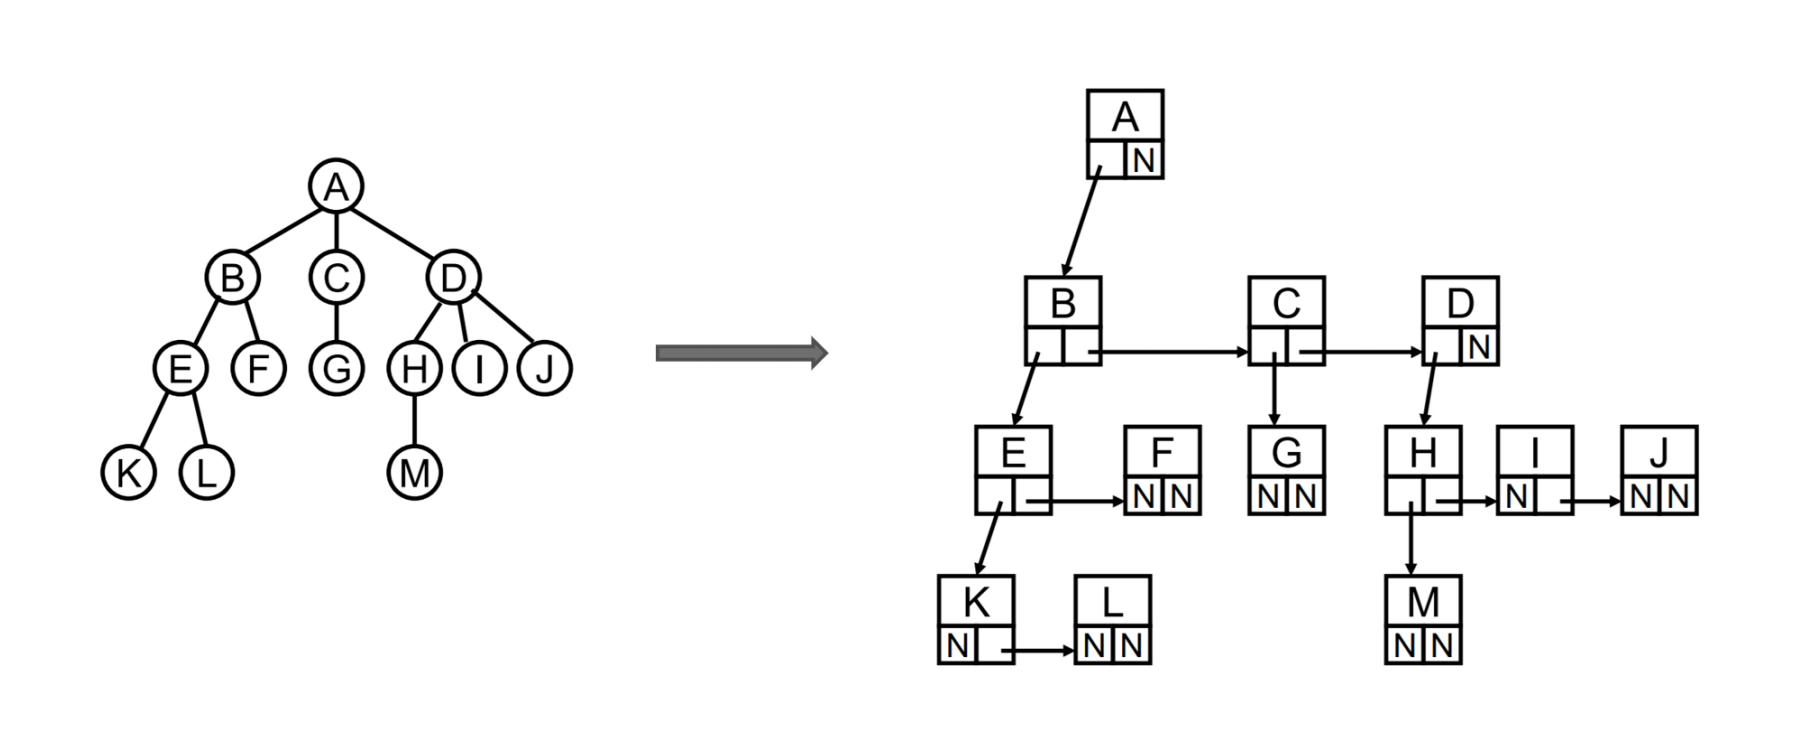
儿子兄弟表示法旋转45°
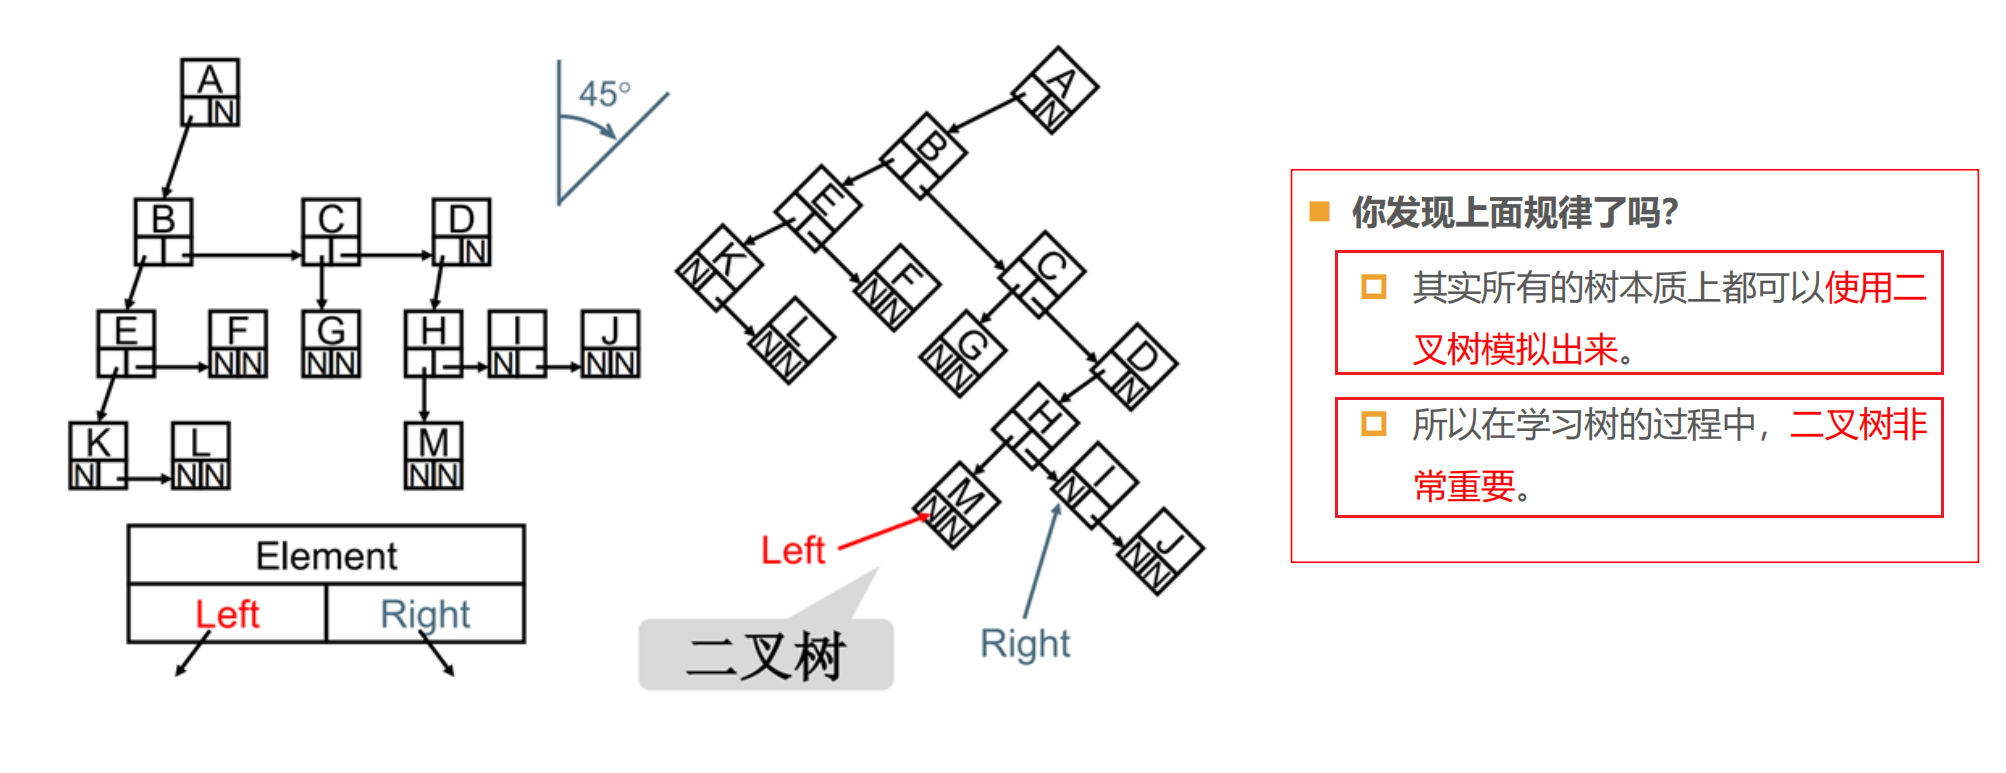
二叉树
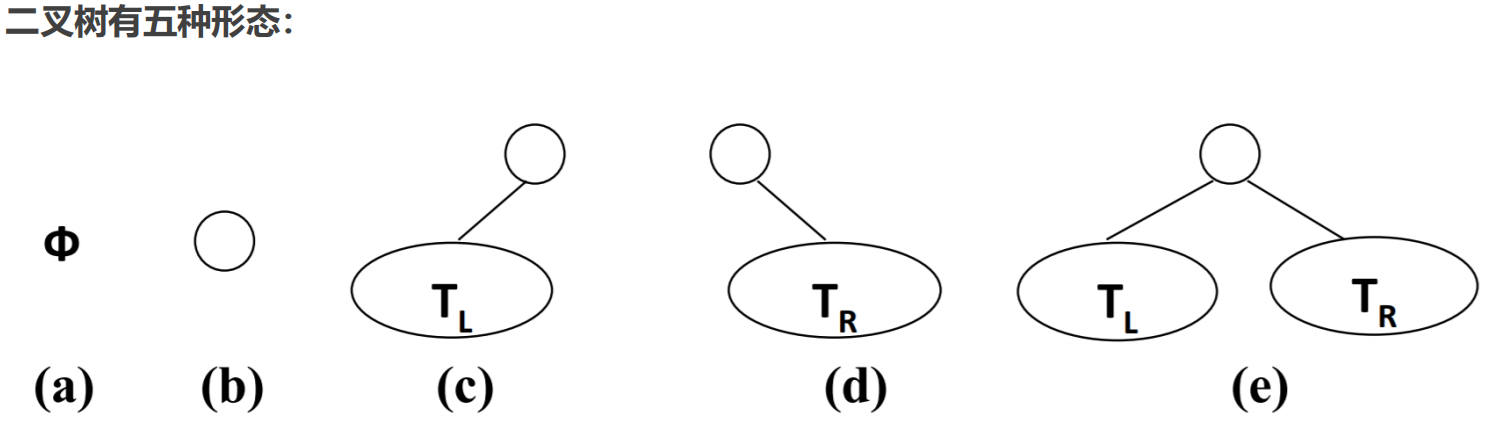
如果树中每个节点最多只能有两个子节点,这样的树就成为"二叉树"。
二叉树可以为空,也就是没有节点。
若不为空,则它是由根节点 和 称为其 左子树TL和 右子树TR 的两个不相交的二叉树组成。
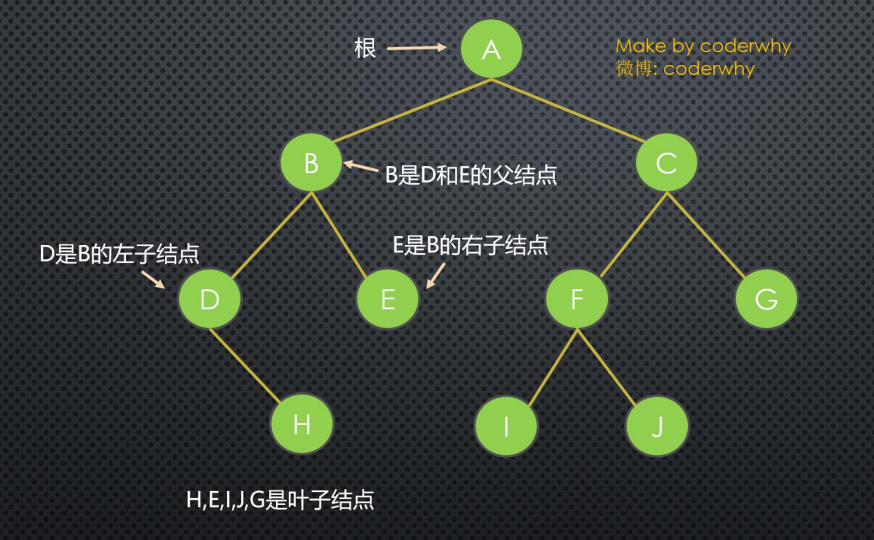
二叉树的特性
一颗二叉树第 i 层的最大节点数为:2^(i-1),i >= 1; 2的n-1次方
深度为k的二叉树有最大节点总数为: 2^k - 1,k >= 1;
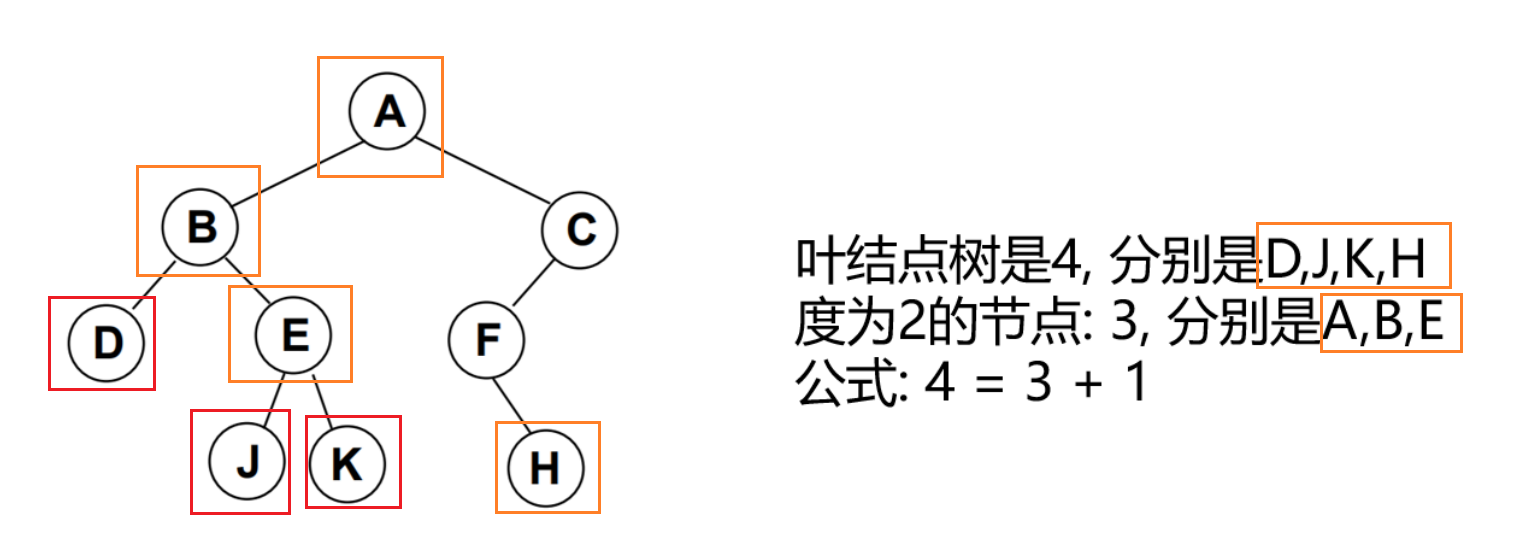
对任何非空二叉树 T,若n0表示叶节点的个数、n2是度为2的非叶节点个数,那么两者满足关系n0 = n2 + 1。
完美二叉树、满二叉树
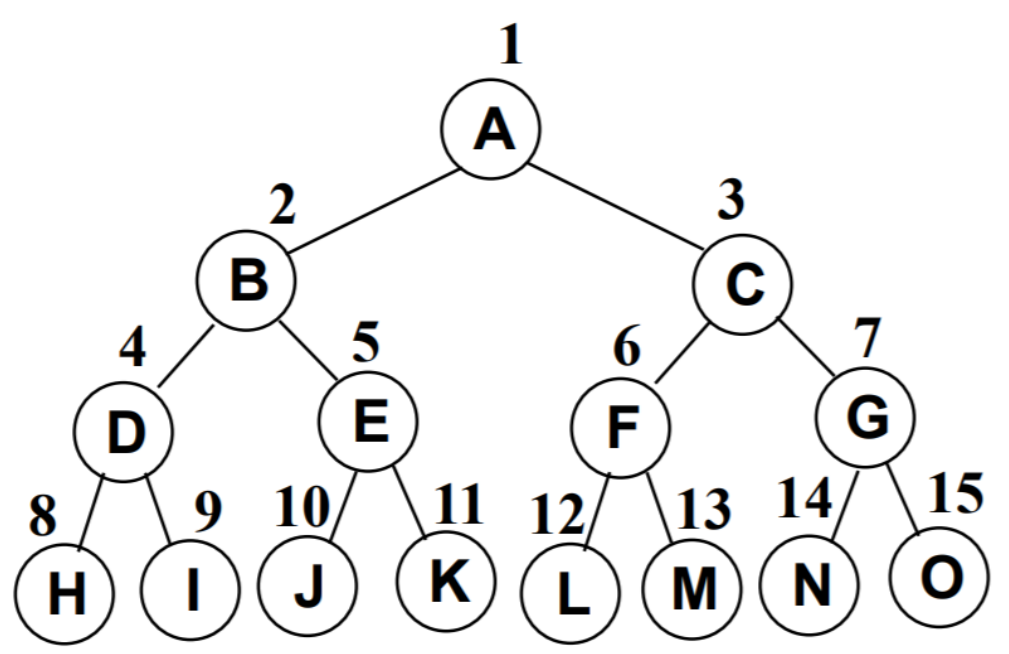
完全二叉树
除二叉树最后一层外,其他各层的节点数都达到最大个数。
且最后一层从左向右的叶节点连续存在,只缺右侧若干节点。
完美二叉树是特殊的完全二叉树。
一句话概括就是满二叉树的基础上,只允许从最后一层的右边开始缺少叶子节点
堆的本质就是一个完全二叉树,且堆可以存放在数组中
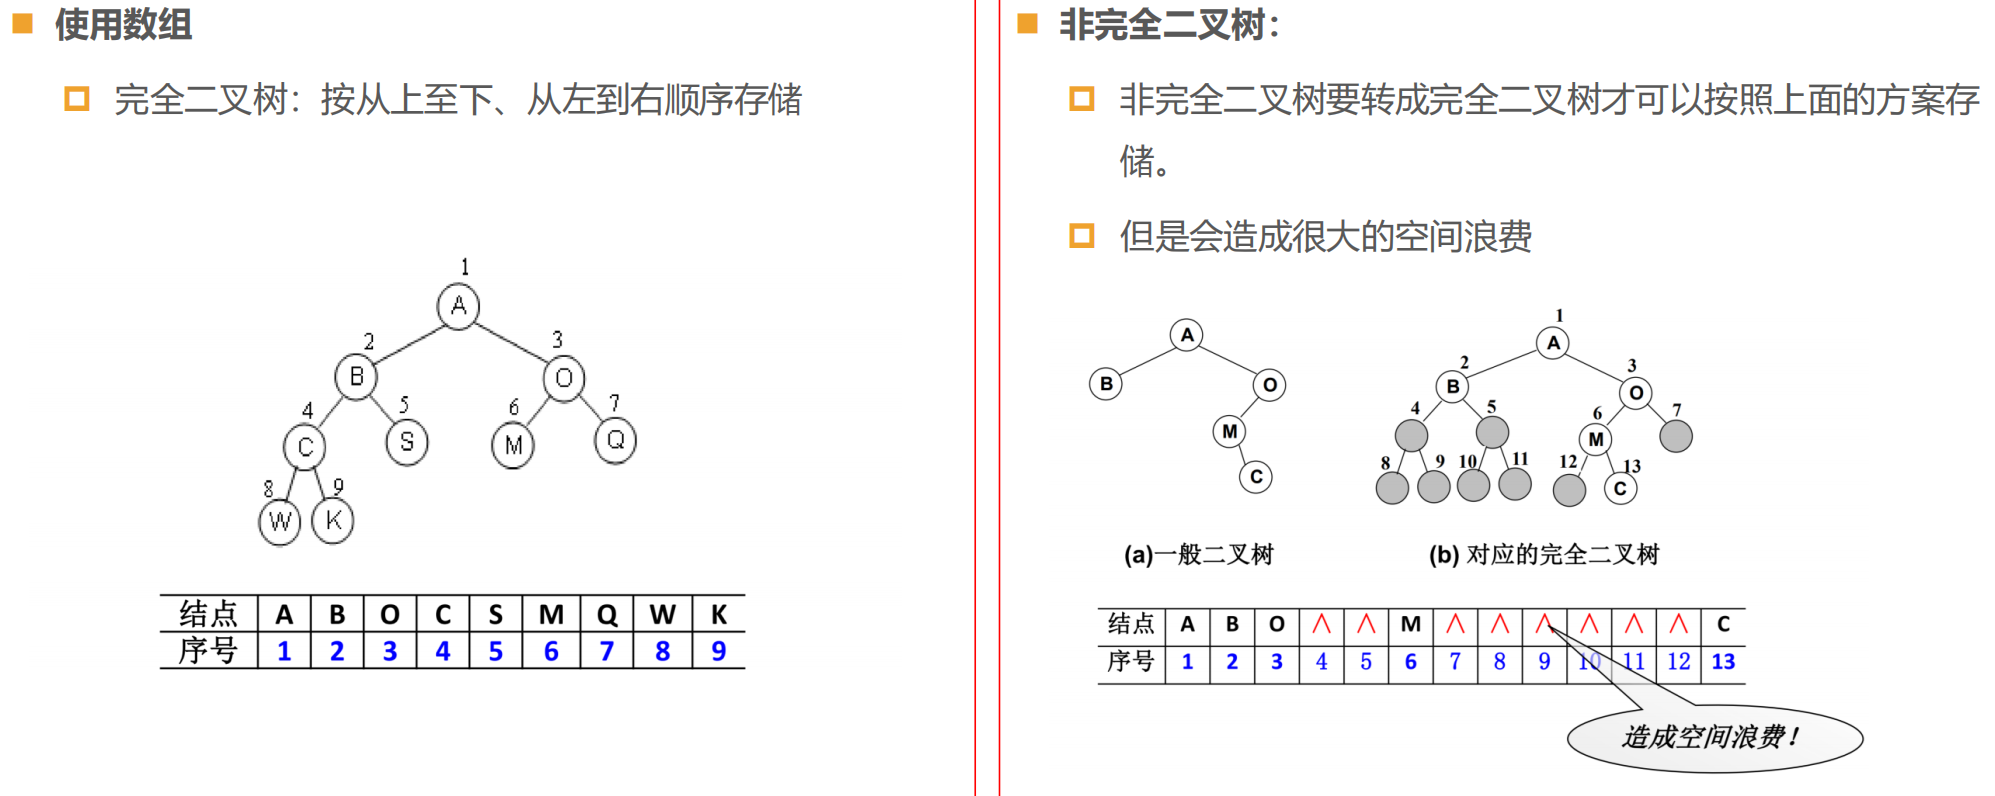
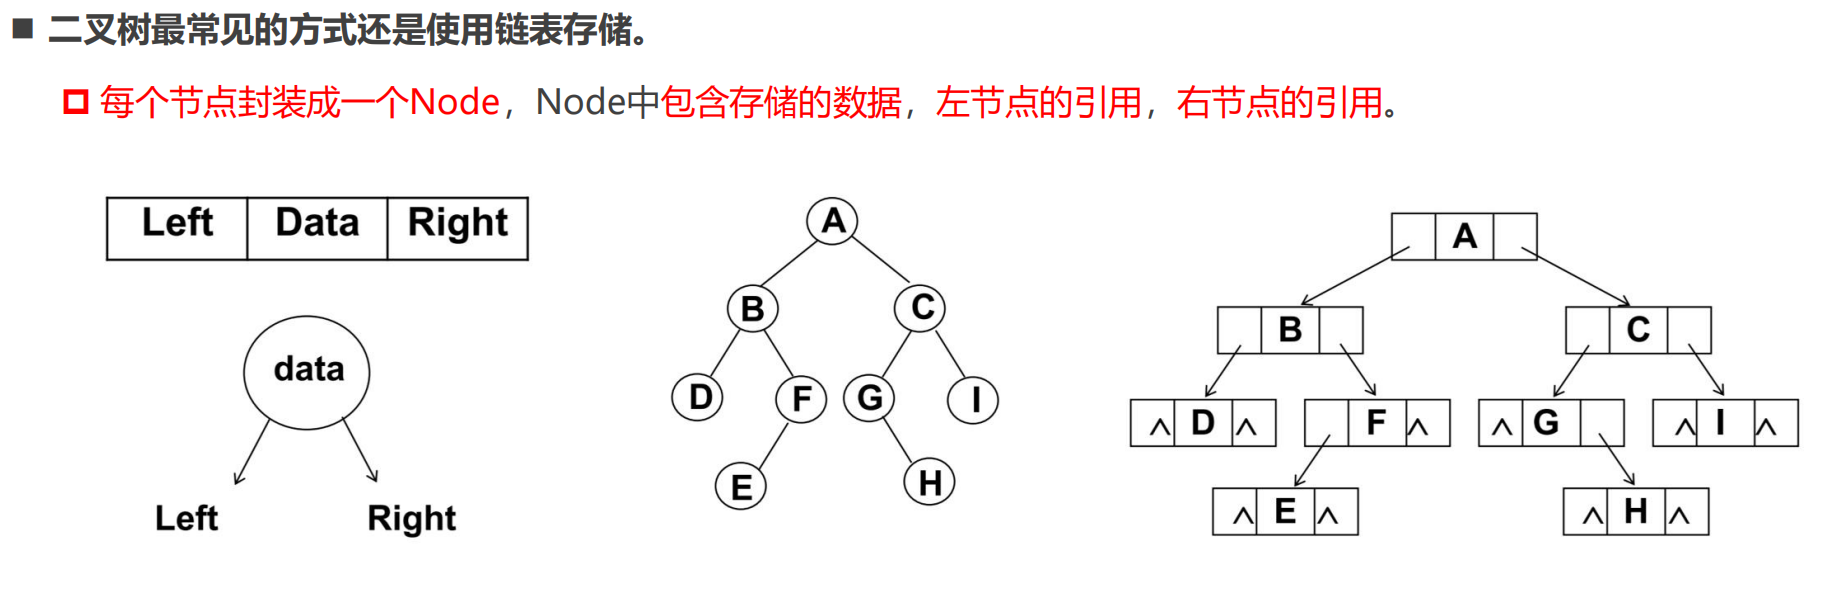
二叉树的存储
二叉树的存储常见的方式是数组和链表。
二叉搜索树(BST)
非空左子树的所有键值小于其根节点的键值。
非空右子树的所有键值大于其根节点的键值。
左、右子树本身也都是二叉搜索树(Binary Search Tree)。
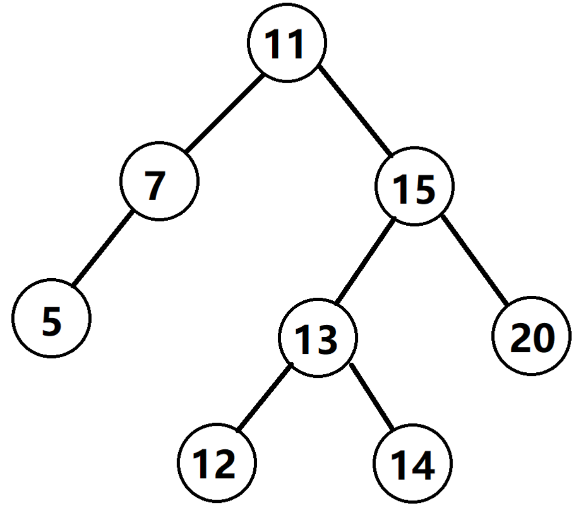
二叉搜索树的特点就是相对较小的值总是保存在左节点上,相对较大的值总是保存在右节点上。
那么利用这个特点,我们可以做什么事情呢?
查找效率非常高,这也是二叉搜索树中,搜索的来源。
查找所需的最大次数等于二叉搜索树的深度;
插入节点时,也利用类似的方法,一层层比较大小,找到新节点合适的位置。
二叉搜索树插入数据
while实现和递归实现
import Node from "../types/Node";

import { btPrint } from 'hy-algokit'

class TreeNode<T> extends Node<T> {
  left: TreeNode<T> | null = null
  right: TreeNode<T> | null = null
}

// BinarySearchTree
class BSTree<T> {
  private root: TreeNode<T> | null = null

  // 打印
  print() {
    btPrint(this.root)
  }

  // 二叉搜索树插入节点
  insert(value: T) {
    // 创建树节点
    const newNode = new TreeNode(value)

    if (!this.root) {
      this.root = newNode
    } else {
      this.insertNode(this.root, newNode)
    }
  }

  // 根据根节点和新节点插入树
  private insertNode(node: TreeNode<T>, newNode: TreeNode<T>) {
    // 1. 循环实现
    // let temp: TreeNode<T> | null = node
    // while (temp) {
    //   if (temp.value > newNode.value) { // 去左边
    //     temp.left ? temp = temp.left : (() => { temp.left = newNode; temp = null })()
    //   } else { // 去右边
    //     temp.right ? temp = temp.right : (() => { temp.right = newNode; temp = null })()
    //   }
    // }

    // 递归实现
    if (newNode.value < node.value) { // 去左边
      !node.left ? node.left = newNode :
        this.insertNode(node.left, newNode)
    } else { // 去右边
      !node.right ? node.right = newNode :
        this.insertNode(node.right, newNode)
    }
  }
}

const bst = new BSTree()

bst.insert(11)
bst.insert(7)
bst.insert(15)
bst.insert(5)
bst.insert(3)
bst.insert(9)
bst.insert(8)
bst.insert(10)
bst.insert(13)
bst.insert(12)
bst.insert(14)
bst.insert(20)
bst.insert(18)
bst.insert(25)
bst.insert(6)

bst.print()
二叉树遍历
先序/中序/后序:取决于访问根节点的时机
先/前序遍历preOrderTraverse
根节点 -> 左节点 -> 右节点
// 递归实现
function preorderTraversal(root: TreeNode | null): number[] {
  if (!root) return []
  const newArr: number[] = []

  newArr.push(root.val)
  if (root.left) { newArr.push(...preorderTraversal(root.left)) }
  if (root.right) { newArr.push(...preorderTraversal(root.right)) }

  return newArr
};
// 非递归实现
function preorderTraversal(root: TreeNode | null): number[] {
  if(!root) return []
  const stack = [root]
  const values: number[] = []

  // 前序遍历为中、左、右
  // 入栈顺序则为右、左、中
  while(stack.length) {
    let headNode = stack[stack.length - 1]

    if(headNode) { // 栈顶不为null
      let temp = stack.pop()!
      if(temp.right) { stack.push(temp.right) } // 右
      if(temp.left) { stack.push(temp.left) } // 左
      stack.push(temp) // 中
      stack.push(null) // null标记节点未访问
    } else {
      stack.pop()
      values.push(stack.pop()!.val)
    }
  }

  return values
}
中序遍历inOrderTraverse
左节点 -> 根节点 -> 右节点
// 递归实现
function preorderTraversal(root: TreeNode | null): number[] {
  if (!root) return []
  const newArr: number[] = []

  if (root.left) { newArr.push(...preorderTraversal(root.left)) }
  newArr.push(root.val)
  if (root.right) { newArr.push(...preorderTraversal(root.right)) }

  return newArr
};
// 非递归实现
function inorderTraversal(root: TreeNode | null): number[] {
  if(!root) return []
  const stack = [root]
  const values: number[] = []

  // 中序遍历为左、中、右
  // 入栈顺序则为右、中、左
  while(stack.length) {
    let headNode = stack[stack.length - 1]

    if(headNode) { // 栈顶不为null
      let temp = stack.pop()!
      if(temp.right) { stack.push(temp.right) } // 右
      stack.push(temp) // 中
      stack.push(null) // null标记节点未访问
      if(temp.left) { stack.push(temp.left) } // 左
    } else {
      stack.pop()
      values.push(stack.pop()!.val)
    }
  }

  return values
}
后序遍历postOrderTraverse
左节点 -> 右节点 -> 根节点
// 递归实现
function preorderTraversal(root: TreeNode | null): number[] {
  if (!root) return []
  const newArr: number[] = []

  if (root.left) { newArr.push(...preorderTraversal(root.left)) }
  if (root.right) { newArr.push(...preorderTraversal(root.right)) }
  newArr.push(root.val)

  return newArr
};
// 非递归实现
  if(!root) return []
  const stack = [root]
  const values: number[] = []

  // 后序遍历为左、右、中
  // 入栈顺序则为中、右、左
  while(stack.length) {
    let headNode = stack[stack.length - 1]

    if(headNode) { // 栈顶不为null
      let temp = stack.pop()!
      stack.push(temp) // 中
      stack.push(null) // null标记节点未访问
      if(temp.right) { stack.push(temp.right) } // 右
      if(temp.left) { stack.push(temp.left) } // 左
    } else {
      stack.pop()
      values.push(stack.pop()!.val)
    }
  }

  return values
层序遍历levelOrderTraverse
使用队列先进先出,出的时候将子节点入队
最大值/最小值
搜索值
删除节点
删除叶子结点
删除非叶子结点
- 删除只有一个子节点的节点(5, 9, 13, 20)
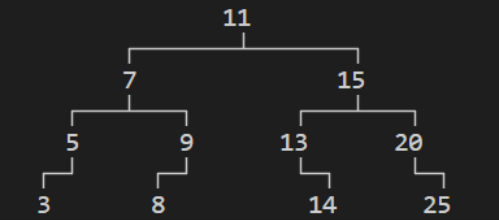
ppwMHv4.png - 删除有两个子节点的节点(重点!!!) 例如删除下图的7、15节点
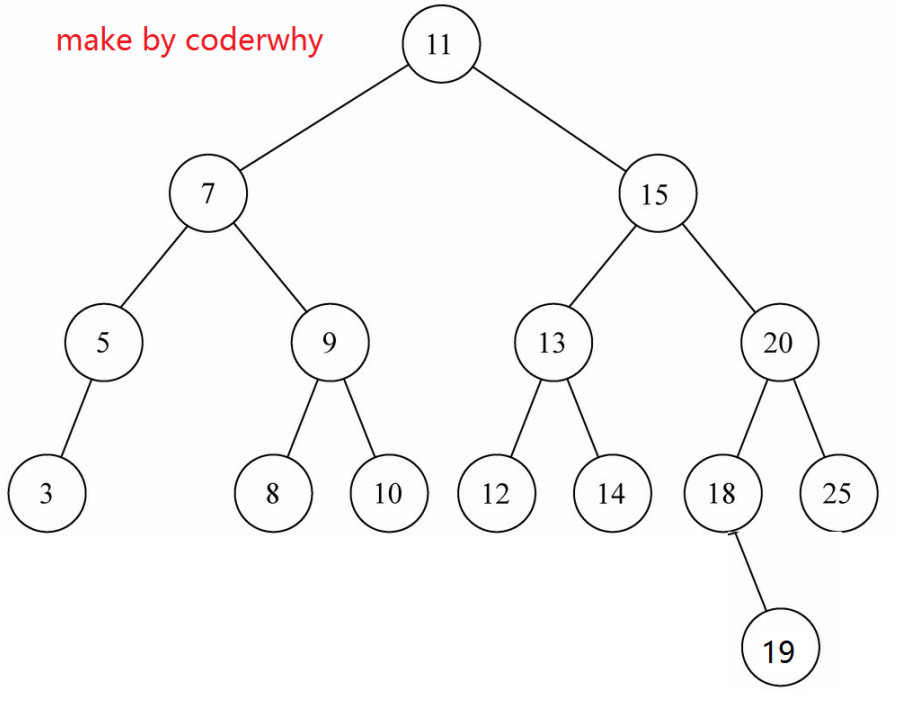
ppwQjyQ.png 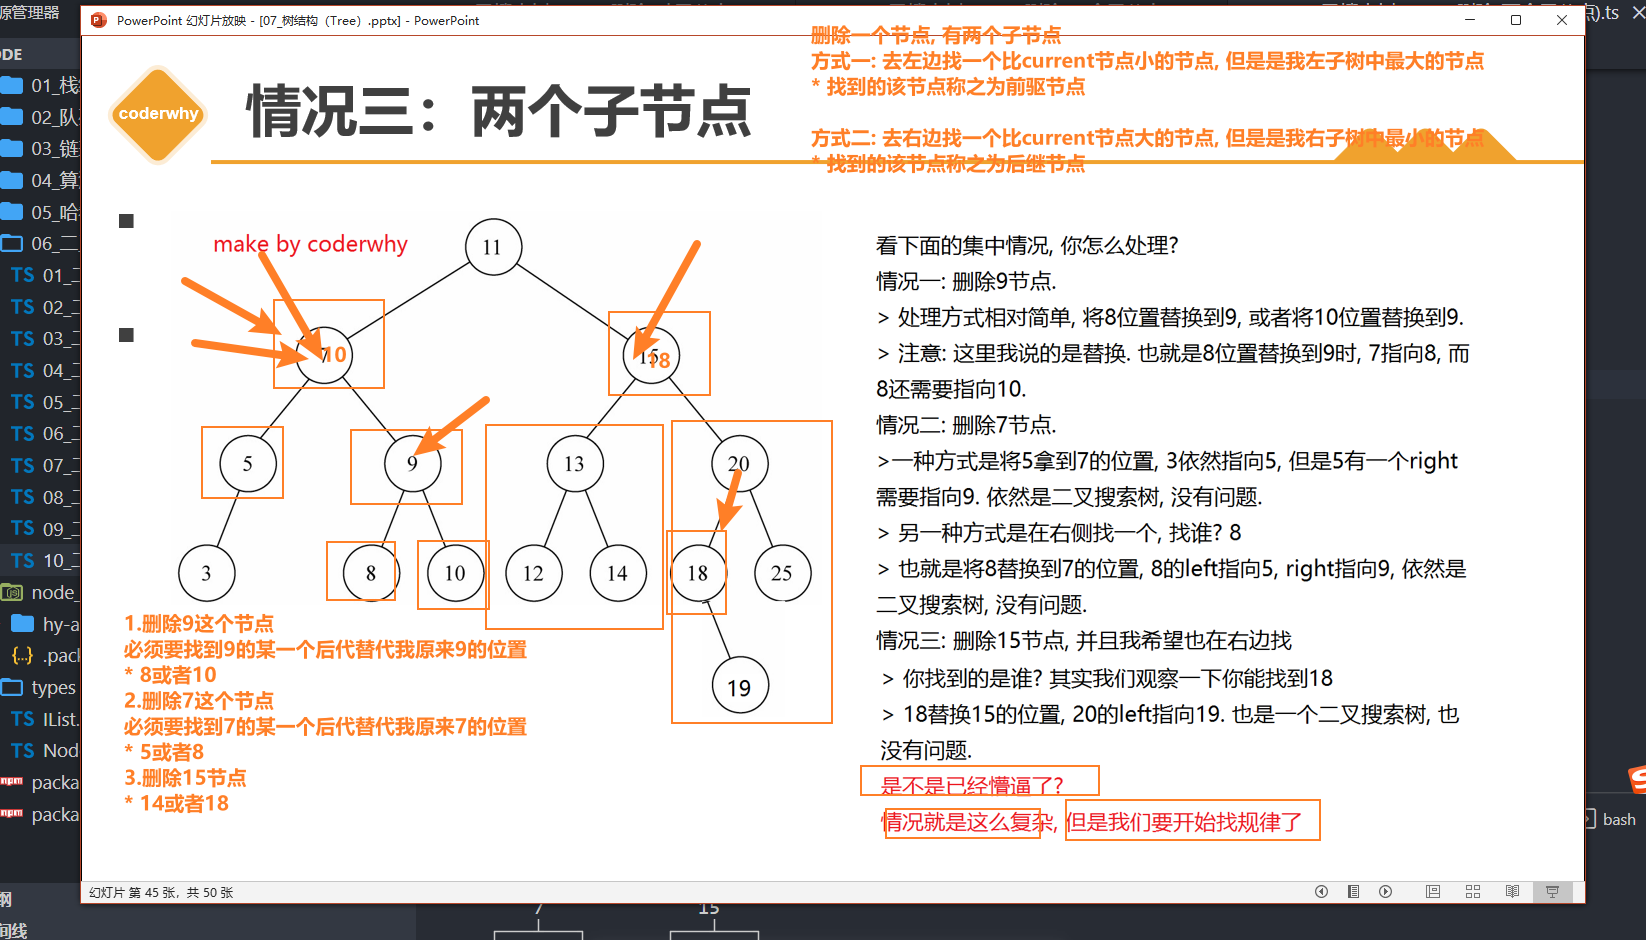
ppwQazF.png 比current小一点点的节点,一定是左子树值最大的节点,称为current节点的前驱节点
比current大一点点的节点,一定是右子树值最小的节点,称为current节点的后继节点
有两个子节点的节点删除总结为:从左子树中找最大值的节点(前驱节点)替换当前节点,或者从右子树中找最小值的节点(后继节点)来替换当前节点
后继节点一定最多只有一个右节点,前驱节点一定最多只有一个左节点
- 后继节点连左
- 后继节点连右(后继节点不为删除节点右子树才要连,后继节点有一颗右子树需特殊处理)
- 后继节点顶部连接
import Node from "../types/Node";

import { btPrint } from 'hy-algokit'

class TreeNode<T> extends Node<T> {
  left: TreeNode<T> | null = null
  right: TreeNode<T> | null = null

  parentNode: TreeNode<T> | null = null

  get isLeft(): boolean {
    return !!(this.parentNode && this.value < this.parentNode.value)
  }

  get isRight(): boolean {
    return !!(this.parentNode && this.value > this.parentNode.value)
  }
}

// BinarySearchTree
class BSTree<T> {
  private root: TreeNode<T> | null = null

  // 打印
  print() {
    btPrint(this.root)
  }

  // 二叉搜索树插入节点
  insert(value: T) {
    // 创建树节点
    const newNode = new TreeNode(value)

    if (!this.root) {
      this.root = newNode
    } else {
      this.insertNode(this.root, newNode)
    }
  }

  // 根据根节点和新节点插入树
  private insertNode(node: TreeNode<T>, newNode: TreeNode<T>) {
    // 1. 循环实现
    // let temp: TreeNode<T> | null = node
    // while (temp) {
    //   if (temp.value > newNode.value) { // 去左边
    //     temp.left ? temp = temp.left : (() => { temp.left = newNode; temp = null })()
    //   } else { // 去右边
    //     temp.right ? temp = temp.right : (() => { temp.right = newNode; temp = null })()
    //   }
    // }

    // 递归实现
    if (newNode.value < node.value) { // 去左边
      !node.left ? node.left = newNode :
        this.insertNode(node.left, newNode)
    } else { // 去右边
      !node.right ? node.right = newNode :
        this.insertNode(node.right, newNode)
    }
  }

  // 搜索节点
  private searchNode(value: T): TreeNode<T> | null {
    if (!this.root) return null

    let temp: TreeNode<T> | null = this.root
    let parent: TreeNode<T> | null = null
    while (temp) {
      if (temp.value === value) return temp

      parent = temp // 获取到父节点
      if (temp.value > value) {
        temp = temp.left
      } else {
        temp = temp.right
      }
      if (temp) temp!.parentNode = parent
    }

    return null
  }

  // 先序/前序遍历
  preOrderTraverse(tree?: TreeNode<T> | null) {
    // 递归实现前序遍历
    if (this.root === null) return
    if (!tree) tree = this.root // 默认取root
    console.log(tree?.value)
    if (tree.left !== null) this.preOrderTraverse(tree.left)
    if (tree.right !== null) this.preOrderTraverse(tree.right)
  }
  // 中序遍历
  inOrderTraverse(tree?: TreeNode<T> | null) {
    // 递归实现中序遍历
    if (this.root === null) return
    if (!tree) tree = this.root // 默认取root
    if (tree.left !== null) this.preOrderTraverse(tree.left)
    console.log(tree?.value)
    if (tree.right !== null) this.preOrderTraverse(tree.right)
  }
  // 后序遍历
  postOrderTraverse(tree?: TreeNode<T> | null) {
    // 递归实现后序遍历
    if (this.root === null) return
    if (!tree) tree = this.root // 默认取root
    if (tree.left !== null) this.preOrderTraverse(tree.left)
    if (tree.right !== null) this.preOrderTraverse(tree.right)
    console.log(tree?.value)
  }
  // 层序遍历
  levelOrderTraverse() {
    if (this.root === null) return
    // 使用数组代替队列效果,先入根节点,
    const valuesArr: TreeNode<T>[] = [this.root] // 默认取root

    while (valuesArr.length) {
      console.log(valuesArr[0].value)
      if (valuesArr[0].left) valuesArr.push(valuesArr[0].left)
      if (valuesArr[0].right) valuesArr.push(valuesArr[0].right)
      // 移除节点前,将子节点入队
      valuesArr.shift()
    }
  }
  // 最大值
  getMaxValue(): T | null {
    if (!this.root) return null
    let temp = this.root
    while (temp.right) { temp = temp.right }
    return temp.value
  }
  // 最小值
  getMinValue(): T | null {
    if (!this.root) return null
    let temp = this.root
    while (temp.left) { temp = temp.left }
    return temp.value
  }
  // 搜索值是否存在
  getValueExist(value: T): boolean {
    return !!this.searchNode(value)
  }
  // 获取节点的后继节点
  private getSuccessor(delNode: TreeNode<T>): TreeNode<T> {
    let current: TreeNode<T> | null = delNode.right
    let successor: TreeNode<T> | null = null
    while (current) { // 找前驱的同时将父节点赋值
      successor = current
      current = current.left
      if (current) {
        current.parentNode = successor
      }
    }

    // 后继节点的连右边操作
    if (successor !== delNode.right) {
      // 后继节点有一个右子树的考虑,后继节点无右子树就相当于删除原二叉树后继节点了,妙
      successor!.parentNode!.left = successor!.right
      successor!.right = delNode.right
    }

    // 后继节点的连左边操作 后继节点的左节点必须继承删除节点的左节点
    successor!.left = delNode.left

    return successor!
  }
  // 删除树节点
  remove(value: T): boolean {
    let current = this.searchNode(value)
    if (!current) return false

    let replaceNode: TreeNode<T> | null = null
    // 删除叶子节点
    if (!current.left && !current.right) {
      replaceNode = null
    }
    // 删除非叶子节点
    // 1. 删除的节点有一个子节点
    // 1.1 只有一个左节点
    else if (current.left && !current.right) {
      replaceNode = current.left
    }
    // 1.1 只有一个右节点
    else if (current.right && !current.left) {
      replaceNode = current.right
    }
    // 2. 删除的节点有两个子节点
    else {
      // 找到删除节点的后继节点
      const successor = this.getSuccessor(current)
      // console.log(current.value, '后继节点是:', successor!.value)
      replaceNode = successor
    }

    if (current === this.root) {
      this.root = replaceNode
    } else if (current.isLeft) {
      current.parentNode!.left = replaceNode
    } else {
      current.parentNode!.right = replaceNode
    }

    return true
  }
}

const bst = new BSTree()

bst.insert(11); bst.insert(7); bst.insert(15); bst.insert(5); bst.insert(3); bst.insert(9); bst.insert(8); bst.insert(10); bst.insert(13); bst.insert(12); bst.insert(14); bst.insert(20); bst.insert(18); bst.insert(25); bst.insert(6);

bst.print()

// console.log(bst.getMaxValue())
// console.log(bst.getMinValue())
// console.log(bst.getValueExist(25))
// console.log(bst.getValueExist(3))
// console.log(bst.getValueExist(4))
// console.log(bst.remove(6))
// console.log(bst.remove(10))
// console.log(bst.remove(12))
// console.log(bst.remove(18))
// bst.print()
// console.log(bst.remove(5))
// console.log(bst.remove(9))
// console.log(bst.remove(13))
// console.log(bst.remove(20))
// console.log(bst.remove(15))
// console.log(bst.remove(7))
console.log(bst.remove(11))
bst.print()
二叉搜索树上使用对象Product比较的实现
import { btPrint, PrintableNode } from 'hy-algokit'

class Node<T> {
  data: T
  constructor(value: T) {
    this.data = value
  }
}

class TreeNode<T> extends Node<T> {
  left: TreeNode<T> | null = null
  right: TreeNode<T> | null = null

  parentNode: TreeNode<T> | null = null

  get isLeft(): boolean {
    return !!(this.parentNode && this.data < this.parentNode.data)
  }

  get isRight(): boolean {
    return !!(this.parentNode && this.data > this.parentNode.data)
  }

  get value() { // 决定了节点展示方式
    const data = (this.data as Product)
    return `${data.name}-${data.price}`
  }
}

// BinarySearchTree
class BSTree<T> {
  private root: TreeNode<T> | null = null

  // 打印
  print() {
    btPrint(this.root)
  }

  // 二叉搜索树插入节点
  insert(value: T) {
    // 创建树节点
    const newNode = new TreeNode(value)

    if (!this.root) {
      this.root = newNode
    } else {
      this.insertNode(this.root, newNode)
    }
  }

  // 根据根节点和新节点插入树
  private insertNode(node: TreeNode<T>, newNode: TreeNode<T>) {

    // 1. 循环实现
    // let temp: TreeNode<T> | null = node
    // while (temp) {
    //   if (temp.data > newNode.data) { // 去左边
    //     temp.left ? temp = temp.left : (() => { temp.left = newNode; temp = null })()
    //   } else { // 去右边
    //     temp.right ? temp = temp.right : (() => { temp.right = newNode; temp = null })()
    //   }
    // }

    // 递归实现
    if (newNode.value < node.value) { // 去左边
      !node.left ? (() => { node.left = newNode; newNode.parentNode = node })() :
        this.insertNode(node.left, newNode)
    } else { // 去右边
      !node.right ? (() => { node.left = newNode; newNode.parentNode = node })() :
        this.insertNode(node.right, newNode)
    }
  }

  // 搜索节点
  private searchNode(value: T): TreeNode<T> | null {
    if (!this.root) return null

    let temp: TreeNode<T> | null = this.root
    let parent: TreeNode<T> | null = null
    while (temp) {
      if (temp.data === value) return temp

      parent = temp // 获取到父节点
      if (temp.data > value) {
        temp = temp.left
      } else {
        temp = temp.right
      }
      if (temp) temp!.parentNode = parent
    }

    return null
  }

  // 先序/前序遍历
  preOrderTraverse(tree?: TreeNode<T> | null) {
    // 递归实现前序遍历
    if (this.root === null) return
    if (!tree) tree = this.root // 默认取root
    console.log(tree?.data)
    if (tree.left !== null) this.preOrderTraverse(tree.left)
    if (tree.right !== null) this.preOrderTraverse(tree.right)
  }
  // 中序遍历
  inOrderTraverse(tree?: TreeNode<T> | null) {
    // 递归实现中序遍历
    if (this.root === null) return
    if (!tree) tree = this.root // 默认取root
    if (tree.left !== null) this.preOrderTraverse(tree.left)
    console.log(tree?.data)
    if (tree.right !== null) this.preOrderTraverse(tree.right)
  }
  // 后序遍历
  postOrderTraverse(tree?: TreeNode<T> | null) {
    // 递归实现后序遍历
    if (this.root === null) return
    if (!tree) tree = this.root // 默认取root
    if (tree.left !== null) this.preOrderTraverse(tree.left)
    if (tree.right !== null) this.preOrderTraverse(tree.right)
    console.log(tree?.data)
  }
  // 层序遍历
  levelOrderTraverse() {
    if (this.root === null) return
    // 使用数组代替队列效果,先入根节点,
    const valuesArr: TreeNode<T>[] = [this.root] // 默认取root

    while (valuesArr.length) {
      console.log(valuesArr[0].data)
      if (valuesArr[0].left) valuesArr.push(valuesArr[0].left)
      if (valuesArr[0].right) valuesArr.push(valuesArr[0].right)
      // 移除节点前,将子节点入队
      valuesArr.shift()
    }
  }
  // 最大值
  getMaxValue(): T | null {
    if (!this.root) return null
    let temp = this.root
    while (temp.right) { temp = temp.right }
    return temp.data
  }
  // 最小值
  getMinValue(): T | null {
    if (!this.root) return null
    let temp = this.root
    while (temp.left) { temp = temp.left }
    return temp.data
  }
  // 搜索值是否存在
  getValueExist(value: T): boolean {
    return !!this.searchNode(value)
  }
  // 获取节点的后继节点
  private getSuccessor(delNode: TreeNode<T>): TreeNode<T> {
    let current: TreeNode<T> | null = delNode.right
    let successor: TreeNode<T> | null = null
    while (current) { // 找前驱的同时将父节点赋值
      successor = current
      current = current.left
      if (current) {
        current.parentNode = successor
      }
    }

    // 后继节点的连右边操作
    if (successor !== delNode.right) {
      // 后继节点有一个右子树的考虑,后继节点无右子树就相当于删除原二叉树后继节点了,妙
      successor!.parentNode!.left = successor!.right
      successor!.right = delNode.right
    }

    // 后继节点的连左边操作 后继节点的左节点必须继承删除节点的左节点
    successor!.left = delNode.left

    return successor!
  }
  // 删除树节点
  remove(value: T): boolean {
    let current = this.searchNode(value)
    if (!current) return false

    let replaceNode: TreeNode<T> | null = null
    // 删除叶子节点
    if (!current.left && !current.right) {
      replaceNode = null
    }
    // 删除非叶子节点
    // 1. 删除的节点有一个子节点
    // 1.1 只有一个左节点
    else if (current.left && !current.right) {
      replaceNode = current.left
    }
    // 1.1 只有一个右节点
    else if (current.right && !current.left) {
      replaceNode = current.right
    }
    // 2. 删除的节点有两个子节点
    else {
      // 找到删除节点的后继节点
      const successor = this.getSuccessor(current)
      // console.log(current.value, '后继节点是:', successor!.value)
      replaceNode = successor
    }

    if (current === this.root) {
      this.root = replaceNode
    } else if (current.isLeft) {
      current.parentNode!.left = replaceNode
    } else {
      current.parentNode!.right = replaceNode
    }

    return true
  }
}

const bst = new BSTree<Product>()

// bst.insert(11); bst.insert(7); bst.insert(15); bst.insert(5); bst.insert(3); bst.insert(9); bst.insert(8); bst.insert(10); bst.insert(13); bst.insert(12); bst.insert(14); bst.insert(20); bst.insert(18); bst.insert(25); bst.insert(6);

class Product {
  constructor(public name: string, public price: number) { }

  valueOf() { // 决定了在节点上树时比较的数据,决定了不同节点的位置
    return this.price
  }
}

const p1 = new Product('xiaomi', 90)
const p2 = new Product('huawei', 190)
const p3 = new Product('oppo', 80)
const p4 = new Product('vivo', 85)
const p5 = new Product('iphone', 79)

bst.insert(p1)
bst.insert(p2)
bst.insert(p3)
bst.insert(p4)
bst.insert(p5)
bst.print()
二叉搜索树缺陷(引出平衡二叉树)
比较好的二叉搜索树数据应该是左右分布均匀的
但是插入连续数据后,分布的不均匀,我称这种树为非平衡树。
对于一棵平衡二叉树来说,插入/查找等操作的效率是O(logN)
对于一棵非平衡二叉树,相当于编写了一个链表,查找效率变成了O(N)
平衡二叉树
为了能以较快的时间O(lgN)来操作一棵树,我们需要尽量保证树总是平衡的
常见的平衡二叉树有:
AVL树
AVL树是最早的一种平衡树。它有些办法保持树的平衡(每个节点多存储了一个额外的数据)
红黑树
红黑树也通过一些特性来保持树的平衡。
插入/删除等操作,红黑树的性能要优于AVL树,所以现在平衡树的应用基本都是红黑树。
图
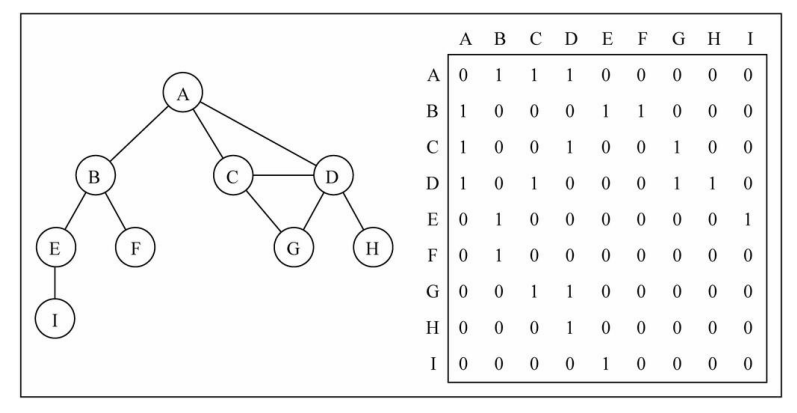
顶点和边组成图,边可以是有向的也可以是无向的
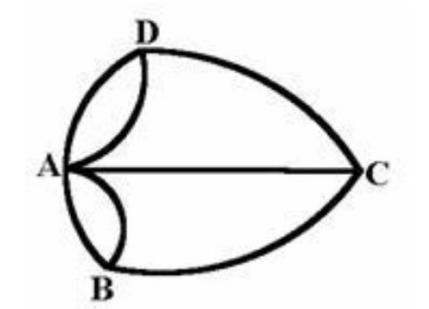
欧拉与七桥问题
如何从某个起点出发,不重复的走完七座桥再回到原点
图的表示方式
邻接矩阵
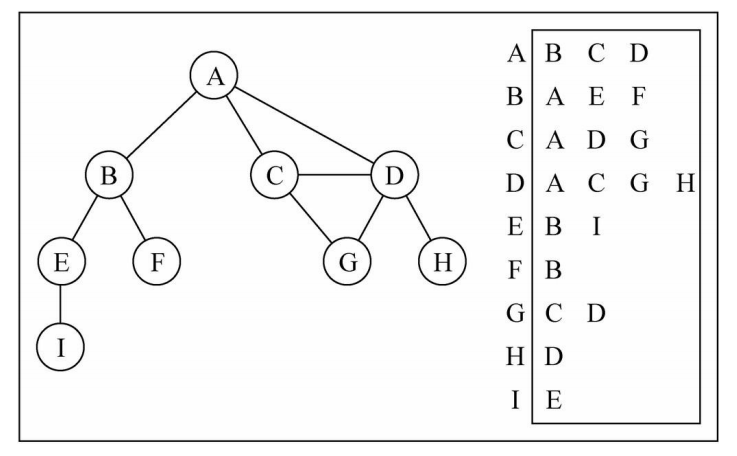
邻接表
出度、入度在有向图中出现
邻接表计算"出度"是比较简单的(出度: 指向别人的数量,入度: 指向自己的数量)
邻接表如果需要计算有向图的"入度",那么是一件非常麻烦的事情。
它必须构造一个“逆邻接表”,才能有效的计算“入度”。但是开发中“入度”相对用的比较少。
图的遍历
广度优先遍历BFS(Breadth-First Search)
深度优先遍历DFS(Depth-First Search)
class Graph<T> {
  // 顶点
  private verteces: T[] = []
  // 邻接表
  private adjList: Map<T, T[]> = new Map()

  // 添加顶点
  addVertex(vertex: T) {
    this.verteces.push(vertex)
    // 添加顶点后,在邻接表添加上相应的map
    this.adjList.set(vertex, [])
  }

  // 添加边
  addEdge(v1: T, v2: T) { // 相互添加
    this.adjList.get(v1)?.push(v2)
    this.adjList.get(v2)?.push(v1)
  }

  // 遍历
  traverse() {
    this.verteces.forEach(vertex => {
      const edge = this.adjList.get(vertex)
      console.log(vertex +'->'+ edge?.join(' '))
    })
  }

  // 广度优先遍历
  breadthSearch(): Set<T> | null {
    if (!this.verteces.length) return null

    // 创建队列
    let queue: T[] = []
    queue.push(this.verteces[0])

    // 创建遍历过的set
    const visited = new Set<T>()
    visited.add(this.verteces[0])

    // 遍历
    while (queue.length) {
      // 获取和[0]顶点有连线的顶点
      const edge = this.adjList.get(queue[0])
      // 去除第一个,加上后续不重复的顶点
      if (edge) {
        // 去除已访问过的顶点
        for (let i = 0; i < edge.length; i++) {
          if (!visited.has(edge[i])) {
            queue.push(edge[i])
            visited.add(edge[i])
          }
        }
      }
      queue = queue.slice(1)
    }

    return visited
  }

  // 深度优先遍历
  depthSearch() {
    if (!this.verteces.length) return
    // 创建访问的set
    const visited = new Set<T>()
    visited.add(this.verteces[0])

    // 创建栈,存放顶点的邻居
    const stack: T[] = []
    stack.push(this.verteces[0])
    while (stack.length) {
      let popValue = stack.pop()!
      console.log(popValue)
      // 拿到邻居,由于栈的先进后出,将邻居反向放入栈内,让最后入栈元素最先出栈
      const edge = this.adjList.get(popValue)
      if (edge?.length) {
        for (let i = (edge.length - 1); i >= 0; i--) {
          if (!visited.has(edge[i])) {
            stack.push(edge[i]);
            // 记录访问过的顶点
            visited.add(edge[i])
          }
        }
      }
    }
  }
}

const graph = new Graph()
for (let i = 65; i < 74; i++) {
  graph.addVertex(String.fromCharCode(i))
}
graph.addEdge('A', 'B')
graph.addEdge('A', 'C')
graph.addEdge('A', 'D')
graph.addEdge('C', 'D')
graph.addEdge('C', 'G')
graph.addEdge('D', 'G')
graph.addEdge('D', 'H')
graph.addEdge('B', 'E')
graph.addEdge('B', 'F')
graph.addEdge('E', 'I')

// graph.traverse()
console.log(graph.breadthSearch()) // A B C D E F G H I
console.log(graph.depthSearch()) // A B E I F C G D H
递归
递归实现基本条件:
- 有合理的结束条件
- 函数自调用
- 回溯的执行代码
- 返回迭代值
反转链表
function reverseList(head: ListNode | null): ListNode | null {
  // 必须有合理的结束条件
  if(!head || head.next === null) return head

  const newHead = reverseList(head.next)

  // 递归需要完成的操作是在自调用函数之后(不一定)
  head.next.next = head
  head.next = null

  // 返回递归值
  return newHead
};
二分查找
// 递归实现
function binarySearch(array: number[], num: number, left: number, right: number): number {
  let index = Math.floor((left + right) / 2)
  let centerValue = array[index]
  if (left === right && num === centerValue) {
    return index
  } else if (left === right && num != centerValue) {
    return -1
  }

  while (left < right) {
    if (centerValue === num) {
      return index
    } else if (centerValue > num) {
      return binarySearch(array, num, left, index - 1)
    } else {
      return binarySearch(array, num, index + 1, right)
    }
  }

  return -1
}

// 非递归实现
function binarySearch(array: number[], num: number): number {
  let left = 0
  let right = array.length - 1

  while (left <= right) {
    let index = Math.floor((left + right) / 2)
    let centerValue = array[index]

    if (centerValue === num) {
      return index
    } else if (centerValue > num) {
      right = index - 1
    } else if (centerValue < num) {
      left = index + 1
    }
  }

  return -1
}
列表转树
const list = [
  { pid: null, id: 1, data: "1" },
  { pid: 1, id: 2, data: "2-1" },
  { pid: 1, id: 3, data: "2-2" },
  { pid: 2, id: 4, data: "3-1" },
  { pid: 3, id: 5, data: "3-2" },
  { pid: 4, id: 6, data: "4-1" },
]

const listToTree = (list, parentId, { idName = 'id', pidName = 'pid', childName = 'children' } = {}) => {
  return list.reduce((pre, cur) => {
    // 当前项父id与需构建的pid父id匹配,进行构建
    if(cur[pidName] === parentId) {
      const children = listToTree(list, cur[idName])
      if(children.length) {
        cur[childName] = children
      }
      return [...pre, cur]
    }
    return pre
  }, [])
}

console.log(listToTree(list, null))