
循环链表
在普通链表的基础上,最后一个节点的下一个节点不再是 null,而是指向链表的第一个节点。
继承自之前封装的LinkedList,只实现差异化的部分
单向链表
export default interface ILinkedList<T> extends IList<T> {
  append(value: T): void
  traverse(): void
  insert(position: number, value: T): void
  removeAt(position: number): T | null
  getValue(position: number): T | null
  update(position: number, value: T): void
  indexOf(value: T): number
  remove(value: T): boolean
}

class Node<T> {
  value: T

  next: Node<T> | null = null

  constructor(value: T) {
    this.value = value
  }
}

export default class LinkedList<T> implements ILinkedList<T> {
  protected head: Node<T> | null = null
  protected length: number = 0

  protected tail: Node<T> | null = null

  get size() {
    return this.length
  }

  peek() {
    return this.head?.value
  }

  // 私有方法,根据position获取链表节点
  private getNode(position: number) {
    let index = 0
    let current = this.head
    while (index++ < position) {
      current = current?.next ?? null
    }
    return current
  }

  // 添加链表元素
  append(value: T) {
    const newNode = new Node(value)

    if (!this.head) {
      this.head = newNode
    } else {
      this.tail!.next = newNode
    }
    this.tail = newNode

    this.length++
  }

  // 最后节点的判断
  private isLastNode(node: Node<T>) {
    return this.tail === node
  }

  // 遍历链表的方法
  traverse() {
    const values: T[] = []

    let current = this.head
    while (current) {
      values.push(current.value)
      if(this.isLastNode(current!)) {
        if(this.head && current.next === this.head) {
          values.push(this.head.value)
        }
        console.log(values.join(' -> '))
        return
      }
      current = current.next
    }
  }

  // 插入节点
  insert(position: number, value: T) {
    if (position < 0 || position > this.length) { throw new Error('position越界')
   }
    const newNode = new Node(value)
    // 头部插入
    if (position === 0) {
      newNode.next = this.head
      this.head = newNode
    } else { // 非头部插入
      let previous = this.getNode(position - 1)
      newNode.next = previous!.next
      previous!.next = newNode
    }
    if(position === this.length) this.tail = newNode
    this.length++
  }

  // 移除节点
  removeAt(position: number): T | null {
    if (position < 0 || position > this.length - 1) { throw new Error('position越界') }

    let value: T | null = null
    if (position === 0) {
      value = this.head!.value
      this.head = this.head!.next
      // this.head = this.head?.next ?? null 三目运算简写
      if(this.length === 1) this.tail = null
    } else {
      let previous = this.getNode(position - 1)
      value = previous!.next!.value
      previous!.next = previous!.next!.next
      if(position === this.length - 1) this.tail = previous
    }

    this.length--
    return value
  }

  // 根据下标获取元素值
  getValue(position: number): T | null {
    if (position < 0 || position >= this.length) {
      throw new Error('position越界')
    }
    let current = this.getNode(position)
    return current?.value ?? null
  }

  // 修改某个节点值
  update(position: number, value: T) {
    if (position < 0 || position >= this.length) {
      throw new Error('position越界')
    }
    let current = this.getNode(position)
    current!.value = value
    return true
  }

  // indexOf实现
  indexOf(value: T): number {
    let current = this.head
    if (!current) { return -1 }
    let index = 0
    while (index < this.length) {
      console.log(index)
      if (current!.value === value) {
        return index
      } else {
        current = current!.next
      }
      index++
    }

    return -1
  }

  // 根据value删除
  remove(value: T): boolean {
    let index = this.indexOf(value)
    return this.removeAt(index) ? true : false
  }

  // 为空判断
  isEmpty(): boolean {
    return this.length > 0 ? false : true
  }
}
循环链表
import LinkedList from "./01_实现单向链表LinkedList";

class CircularLinkedList<T> extends LinkedList<T> {
  append(value: T): void {
    super.append(value)
    this.tail!.next = this.head
  }

  insert(position: number, value: T): void {
    super.insert(position, value)
    if (this.tail && (position === 0 || position === this.length - 1)) this.tail.next = this.head
  }

  removeAt(position: number): T | null {
    const res = super.removeAt(position)
    if (this.tail && (res && (position === 0 || position === this.length))) {
      this.tail.next = this.head
    }
    return res
  }
}
双向链表
既可以从头遍历到尾, 又可以从尾遍历到头.
一个节点既有向前连接的引用prev, 也有一个向后连接的引用next.
append方法:在尾部追加元素
prepend方法:在头部添加元素
postTraverse方法:从尾部遍历所有节点
insert方法:根据索引插入元素
removeAt方法:根据索引删除元素
import LinkedList from './01_实现单向链表LinkedList'
import { DoublyNode } from './LinkedNode'

class DoublyLinkedList<T> extends LinkedList<T> {
  head: DoublyNode<T> | null = null
  tail: DoublyNode<T> | null = null

  append(value: T): void {
    const newNode = new DoublyNode(value)

    if (!this.head) {
      this.head = newNode
      this.tail = newNode
    } else {
      this.tail!.next = newNode
      newNode.prev = this.tail
      this.tail = newNode
    }

    this.length++
  }

  prepend(value: T): void {
    const newNode = new DoublyNode(value)

    if (!this.head) {
      this.head = newNode
      this.tail = newNode
    } else {
      newNode.next = this.head
      this.head.prev = newNode
      this.head = newNode
    }

    this.length++
  }

  postTraverse() {
    let tail = this.tail
    const values: T[] = []
    while (tail) {
      values.push(tail.value)
      tail = tail.prev
    }

    console.log(values.join(' -> '))
  }

  insert(position: number, value: T): void {
    if (position < 0 || position > this.length) throw new Error('插入的position越界')

    const newNode = new DoublyNode(value)
    if (this.head) {
      if (position === 0) { // 头部插入
        // newNode.next = this.head
        // this.head.prev = newNode
        // this.head = newNode
        this.prepend(value)
        this.length--
      } else if (position === this.length) { // 尾部插入
        // this.tail!.next = newNode
        // newNode.prev = this.tail
        // this.tail = newNode
        this.append(value)
        this.length--
      } else { // 中间插入
        console.log(position)
        const preNode = (this.getNode(position - 1) as DoublyNode<T>)
        // 改动四个指针的指向
        newNode.next = preNode.next
        newNode.prev = preNode
        preNode!.next!.prev = newNode
        preNode!.next = newNode
      }
    } else {
      this.head = newNode
      this.tail = newNode
    }

    this.length++
  }

  removeAt(position: number): T | null {
    if (position < 0 || position >= this.length) { throw new Error('移除的position越界') }

    let removeValue: T | null = null
    if (this.head) {
      if (this.length === 1) { // 只有一个节点的移除
        removeValue = this.head!.value
        this.head = null
        this.tail = null
      } else {
        if (position === 0) { // 移除头部
          removeValue = this.head!.value
          let temp = this.head.next
          // this.head.next = null // 这行不必写
          temp!.prev = null
          this.head = temp
        } else if (position === this.length - 1) { // 移除尾部
          removeValue = this.tail!.value
          this.tail = this.tail!.prev!
          this.tail.next = null
        } else { // 移除中间节点
          const preNode = (this.getNode(position - 1) as DoublyNode<T>)
          removeValue = preNode!.next!.value
          preNode.next!.next!.prev = preNode
          preNode.next = preNode.next!.next
        }
      }
    }

    removeValue ? this.length-- : (() => { })()
    console.log('移除的节点:', removeValue, '剩余长度:', this.length)
    return removeValue
  }
}
堆结构(Heap)
堆的本质
堆的本质是一种特殊的树形数据结构,使用完全二叉树(满二叉树的基础上,只允许从最后一层的右边开始缺少节点)来实现:
堆可以进行很多分类,但是平时使用的基本都是二叉堆;
二叉堆又可以划分为最大堆和最小堆;
最大堆和最小堆:
最小堆:堆中每一个节点都小于等于(<=)它的子节点;
最大堆:堆中每一个节点都大于等于(>=)它的子节点;
为什么需要堆结构
获取最大值,最小值,以及获取Top(K)问题的解决方法可用堆结构更方便的实现
堆结构(完全二叉树)与数组结构的转换关系
将堆结构已层序遍历的方式放入数组内后:
- 堆结构(完全二叉树)中每一个节点的索引关系:
- 父节点索引:i
- 左子节点索引:2 * i + 1
- 右子节点索引:2 * i + 2
最大堆的插入操作
- 值push入数组
- 值上滤找位置
- 上滤:
- 找父节点索引
- 对比大小,交换或return
- 到达顶点则return
最大堆的删除操作(删除根节点元素)
- 数组**末端元素替换需要删除的节点(根节点)**值,移除最后的数据
- 第一步操作让整个完全二叉树只有一个元素不符合最大堆的特性,之后进行下滤操作即可
- 下滤:
- 取最后一个元素值替换根节点值后,删除最后的元素
- 对比子节点值最大的节点,大于则return,小于则交换,不断重复直至无子节点
Heap的数组原地建堆方法(buildHeap)
- 将数组从后往前遍历,如果判断出节点有子树(根据完全二叉树的特性一定是有左子树,或者有左右两个子树),则进行下滤操作
- 从后往前依次将树变成一个完全二叉树,返回即可(最后需将借用heap的data和length属性进行还原)
- 最后一个非叶子节点的下标一定为Math.floor(arr.length / 2) - 1
Heap(最大堆)的insert、extract、buildHeap代码实现
export interface IHeap<T> {
  insert(value: T): void
  extract(): T | undefined
  peek(): T | undefined
  get size(): number
  isEmpty(): boolean
  buildHeap(arr: T[]): T[]
}

// 最大堆实现
class Heap<T> implements IHeap<T> {
  private data: T[] = []
  private length: number = 0

  private swap(i: number, j: number) {
    [this.data[i], this.data[j]] = [this.data[j], this.data[i]]
  }

  // 上/下滤函数,通过下标和父节点下标找到值的存放位置
  private findPlace(i: number, j: number, percolateUp: boolean) {
    // console.log('父节点索引:', j)
    if (j < 0) return // 无父节点
    if (percolateUp ? this.data[i] > this.data[j] : this.data[i] < this.data[j]) { // 需要交换
      this.swap(i, j)
    } else return
    // 持续上滤
    this.findPlace(j, Math.floor((j % 2 === 0 ? j - 2 : j - 1) / 2), percolateUp)
  }

  insert(value: T) {
    if (this.length === 0) {
      this.data = [value]
    } else {
      // 当前插入数据在中的索引
      let curIndex = this.length
      this.data[curIndex] = value
      // 父节点索引
      let parIndex: number = Math.floor((curIndex % 2 === 0 ? curIndex - 2 : curIndex - 1) / 2)
      // 上滤操作获取最大堆
      this.findPlace(curIndex, parIndex, true)
      // 上滤操作获取最小堆
      // this.findPlace(curIndex, parIndex, false)
    }
    this.length++
  }

  // 下滤函数
  private percolateDown(index: number) {
    const curValue = this.data[index]
    let leftChildIndex = 2 * index + 1
    let rightChildIndex = 2 * index + 2

    // 左子树存在且右子树存在
    if (rightChildIndex <= this.length - 1) {
      let leftChildValue = this.data[leftChildIndex]
      let rightChildValue = this.data[rightChildIndex]
      // 大于左子树且大于右子树
      if (curValue >= leftChildValue && curValue >= rightChildValue) return
      // 左 > 右
      if (leftChildValue > rightChildValue) {
        if (leftChildValue > curValue) {
          this.swap(index, leftChildIndex)
          this.percolateDown(leftChildIndex)
        } else return
      } else { // 右 > 左
        if (rightChildValue > curValue) {
          this.swap(index, rightChildIndex)
          this.percolateDown(rightChildIndex)
        } else return
      }
    }
    // 仅左子树存在
    else if (leftChildIndex <= this.length - 1 && rightChildIndex > this.length - 1) {
      let leftChildValue = this.data[leftChildIndex]
      if (leftChildValue > curValue) {
        this.swap(index, leftChildIndex)
        this.percolateDown(leftChildIndex)
      } else return
    }
    // 仅右子树存在(完全二叉树中不存在该情况)
    // 已无左右子树
    else return
  }

  // 提取操作(获得并删除顶部元素)
  extract(): T | undefined {
    if (this.length === 0) return undefined
    if (this.length === 1) {
      this.length--
      return this.data.pop()
    }
    let topValue: T = this.data[0]
    // 赋值且移除最后一个节点的操作
    this.data[0] = this.data[this.length - 1]
    this.data.pop()
    this.length--
    // 下滤操作
    this.percolateDown(0)

    return topValue
  }
  peek(): T | undefined {
    return this.data[0]
  }
  get size(): number {
    return this.length
  }
  isEmpty(): boolean {
    return this.length === 0
  }
  buildHeap(arr: T[]): T[] {
    let index = arr.length - 1
    const temp = this.data
    const dataLength = this.length
    // 借用下滤函数和data属性
    this.data = [...arr]
    this.length = arr.length
    while (index >= 0) {
      // 存在子树,则开始进行下滤操作
      if ((2 * index + 1) <= (arr.length - 1)) {
        this.percolateDown(index)
      }
      index--
    }
    arr = [...this.data]
    // 还原data和length
    this.data = temp
    this.length = dataLength
    return arr
  }
}
高阶链表结构
双端队列
双端队列在单向队列的基础上解除了一部分限制:允许在队列的两端添加(入队)和删除(出队)元素
export default class ArrayQueue<T> implements IQueue<T> {
  protected array: T[] = []

  enQueue(element: T): void {
    this.array.push(element)
  }

  deQueue(): T | undefined {
    return this.array.shift()
  }

  peek(): T | undefined {
    return this.array[0]
  }

  isEmpty(): boolean {
    return Boolean(!this.array.length)
  }

  get size(): number {
    return this.array.length
  }
}
// 双端队列
class ArrayDQueue<T> extends ArrayQueue<T> {
  addFront(value: T) {
    this.array.unshift(value)
  }

  removeTail(): T | undefined {
    if (this.array.length) {
      return this.array.pop()!
    } else return undefined
  }
}
优先级队列
优先级队列(Priority Queue)是一种比普通队列更加高效的数据结构
优先级队列可以用数组、链表等数据结构来实现,但是堆是最常用的实现方式
实现方式一:根据传入的数据优先级和堆结构进行出队
import Heap from '../09_堆结构Heap/04_堆Heap的结构实现(buildHeap数组原地建堆)'

class PriorityNode<T> {
  priority: number
  value: T

  constructor(value: T, priority: number) {
    this.value = value
    this.priority = priority
  }

  valueOf() {
    return this.priority
  }
}

// 根据插入数据的优先级队列的实现
class PriorityQueue<T> {
  private heap: Heap<PriorityNode<T>> = new Heap<PriorityNode<T>>()

  insert(value: T, priority: number) {
    const node = new PriorityNode(value, priority)
    this.heap.insert(node)
  }

  deQueue(): T | undefined {
    return this.heap.extract()?.value
  }

  traverse() {
    return this.heap.print()
  }

  peek(): T | undefined {
    return this.heap.peek()?.value
  }

  isEmpty(): boolean {
    return this.heap.isEmpty()
  }
}

const priorityQueue = new PriorityQueue<string>()
priorityQueue.insert('csa', 70)
priorityQueue.insert('aaa', 80)
priorityQueue.insert('ddd', 30)
priorityQueue.insert('gre', 55)
priorityQueue.traverse()
while (!priorityQueue.isEmpty()) {
  console.log(priorityQueue.deQueue())
}
实现方式二:根据实例对象的valueOf优先级和堆结构进行出队
import Heap from '../09_堆结构Heap/04_堆Heap的结构实现(buildHeap数组原地建堆)'

// 根据实例对象的优先级队列实现
class PriorityQueue<T> {
  private heap: Heap<T> = new Heap<T>()

  enQueue(value: T) {
    this.heap.insert(value)
  }

  deQueue(): T | undefined {
    return this.heap.extract()
  }

  traverse() {
    return this.heap.print()
  }

  peek(): T | undefined {
    return undefined
  }

  isEmpty(): boolean {
    return this.heap.isEmpty()
  }

  get size() {
    return this.heap.size
  }
}

class Student {
  private name: string
  private score: number
  constructor(name: string, score: number) {
    this.name = name
    this.score = score
  }

  valueOf() {
    return this.score
  }
}

const priorityQueue = new PriorityQueue<Student>()
priorityQueue.enQueue(new Student('aaa', 90))
priorityQueue.enQueue(new Student('ccc', 88))
priorityQueue.enQueue(new Student('ddd', 99))
priorityQueue.enQueue(new Student('sss', 78))
while (!priorityQueue.isEmpty()) {
  console.log(priorityQueue.deQueue())
}
平衡二叉树
平衡树通过不断调整树的结构,使得树的高度尽量平衡,从而保证搜索、插入、删除等操作的时间复杂度都较低,通常为O(logn)
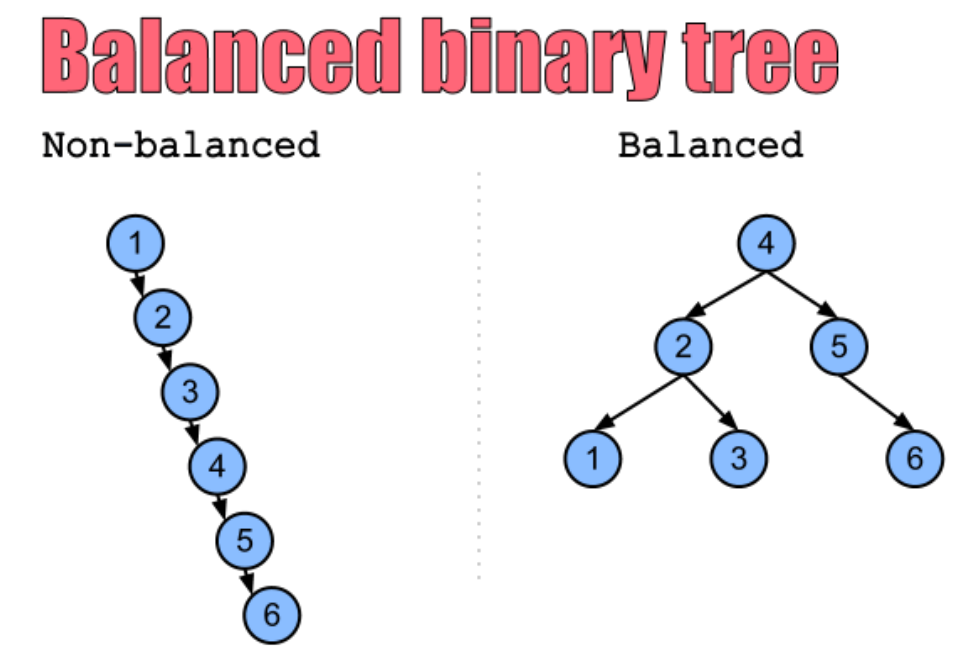
事实上不只是添加会导致树的不平衡,删除元素也可能会导致树的不平衡。
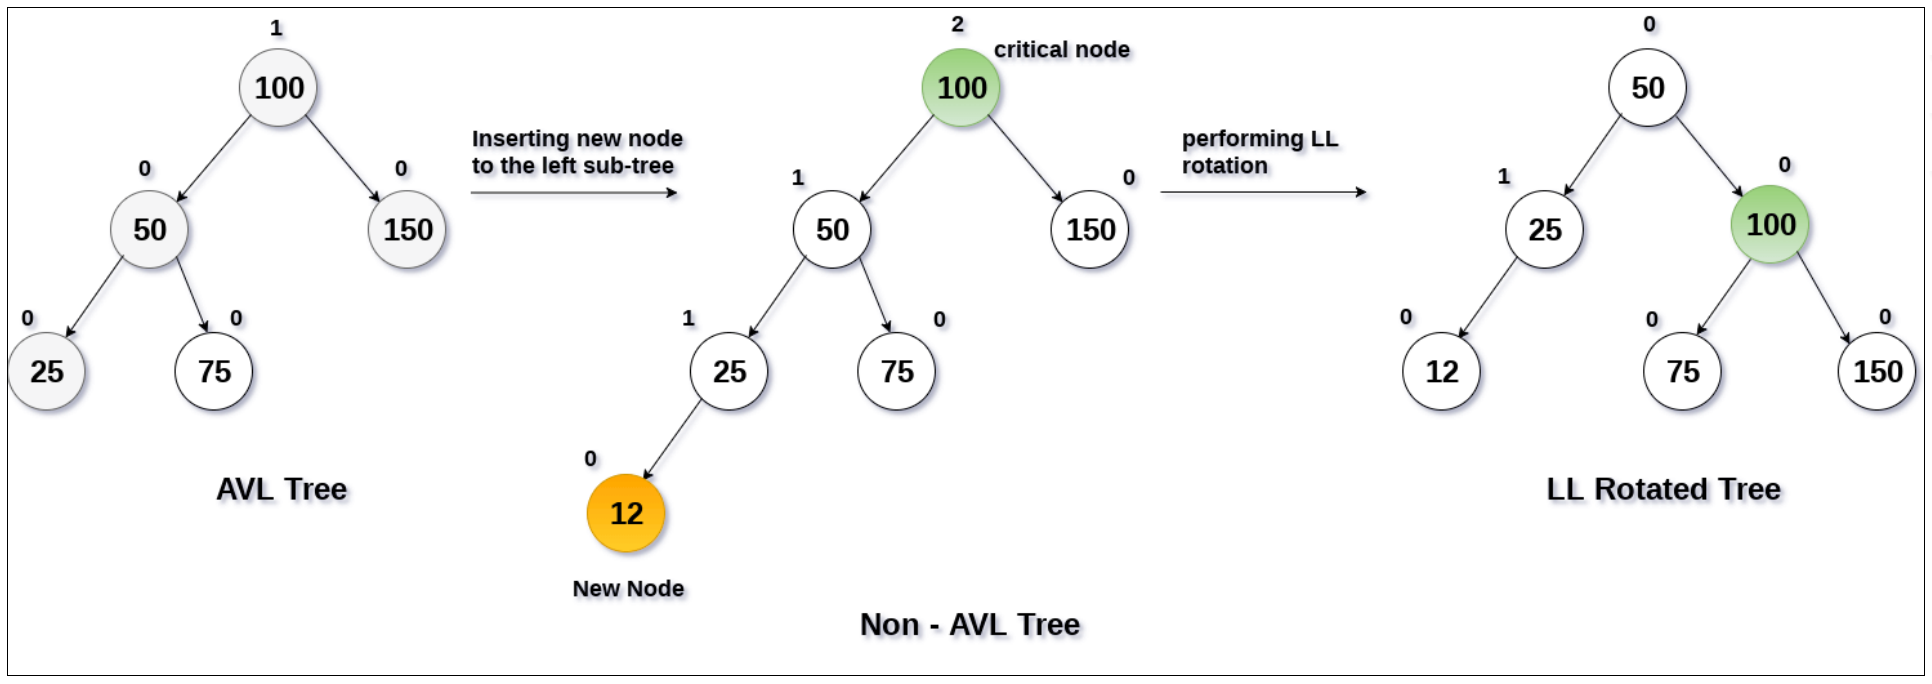
在随机插入或者删除元素后,通过某种方式观察树是否平衡,如果不平衡通过特定的方式**(比如旋转)**,让树保持平衡。
常见的平衡二叉树
AVL树:这是一种最早的平衡二叉搜索树,在1962年由G.M. Adelson-Velsky和E.M. Landis发明。
红黑树:这是一种比较流行的平衡二叉搜索树,由R. Bayer在1972年发明。
Splay树:这是一种动态平衡二叉搜索树,通过旋转操作对树进行平衡。
Treap:这是一种随机化的平衡二叉搜索树,是二叉搜索树和堆的结合。
B-树:这是一种适用于磁盘或其他外存存储设备的多路平衡查找树。
红黑树:红黑树被广泛应用于实现诸如操作系统内核、数据库、编译器等软件中的数据结构,其原因在于它在插入、删除、查找操作时都具有较低的时间复杂度。
AVL树:AVL树被用于实现各种需要高效查询的数据结构,如计算机图形学、数学计算和计算机科学研究中的一些特定算法。
AVL树
- 一种自(self)平衡二叉搜索树
- 二叉搜索树的一个变体,在保证二叉搜索树的同时,通过旋转保证树的平衡
- 在AVL树中,每个节点都有一个权值,该权值代表了以该节点为根节点的子树的高度差。
- 在AVL树中,任意节点的权值只有1、-1或0,因此AVL树也被成为高度平衡树
- 对于每一个节点,它的左子树和右子树高度差不超过1
- 当插入或删除节点时,AVL树可以通过旋转操作来重新平衡树,从而保证其平衡性
- 平衡树的旋转操作有四种:左左情况、右右情况、左右情况和右左情况
- 由于AVL树具有自平衡性,因此其查找最坏情况下的时间复杂度仅为O(lg n)
AVL树的旋转
核心图片!!!!!
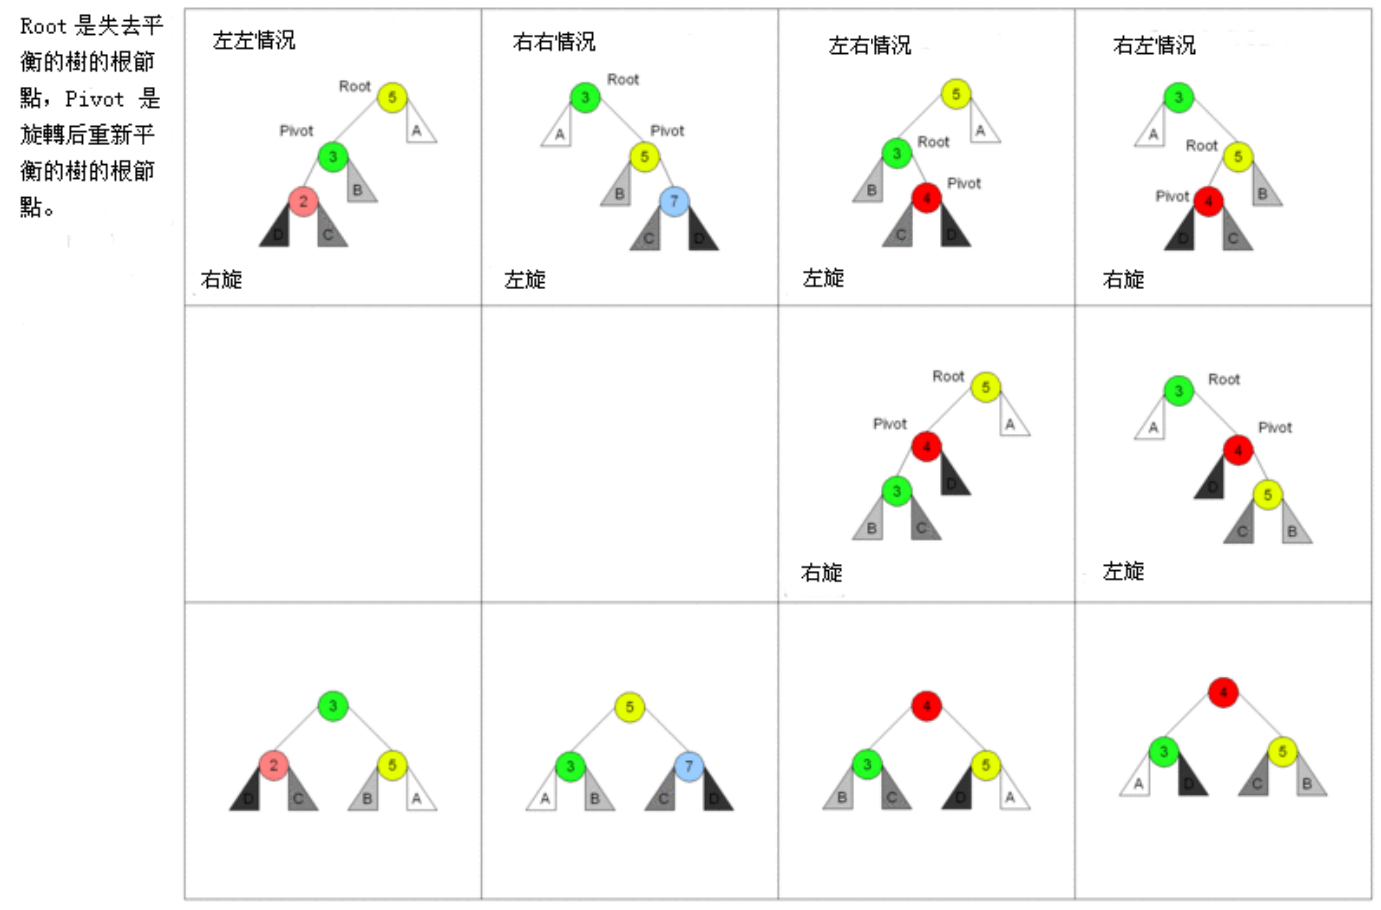
- AVL树的旋转的核心为:找到不平衡的节点,从不平衡节点往下分析是LL/LR/RR/RL哪种不平衡的情况
再平衡实现
// 在不平衡节点的基础上,判断不平衡情况,根据进行旋转平衡
rebalance(root: AVLTreeNode<T>) {
  // 获取不平衡方向上的子节点和孙子节点
  const pivot = root.getHigherChildNode()
  const pivotNext = pivot?.getHigherChildNode()

  let resultNode: AVLTreeNode<T> | null = null
  if (pivot?.isLeft) { // L
    if (pivotNext?.isLeft) { // LL
      resultNode = root.rightRotate()
    } else { // LR
      pivot.leftRotate()
      resultNode = root.rightRotate()
    }
  } else { // R
    if (pivotNext?.isRight) { // RR
      resultNode = root.leftRotate()
    } else { // RL
      pivot?.rightRotate()
      resultNode = root.leftRotate()
    }
  }

  // 当root为整个二叉树的根节点时,返回的result已无this.root指向它,所以需单独处理
  if (!resultNode.parentNode) this.root = resultNode
}
插入节点的再平衡检测
// 父类:
// 具体检查平衡,在子类中实现
protected checkBalance(node: TreeNode<T>) { }

// 二叉搜索树插入节点
insert(value: T) {
  // 创建树节点
  const newNode = this.createNode(value)

  if (!this.root) {
    this.root = newNode
  } else {
    this.insertNode(this.root, newNode)
  }

  // 模板模式实现父类调子类方法
  this.checkBalance(newNode)
}

// 子类
// 插入节点后找到不平衡节点(类方法的模板模式),插入只会影响一个节点不平衡
protected checkBalance(node: TreeNode<T>): void {
  let current = node.parentNode as AVLTreeNode<T>
  while (current) {
    if (!current.isBalanced) {
      console.log(current.value, '不平衡')
      this.rebalance(current)
    }
    current = current.parentNode!
  }
}
删除节点的parentNode处理
有两个子节点的情况下,需要处理的指针:
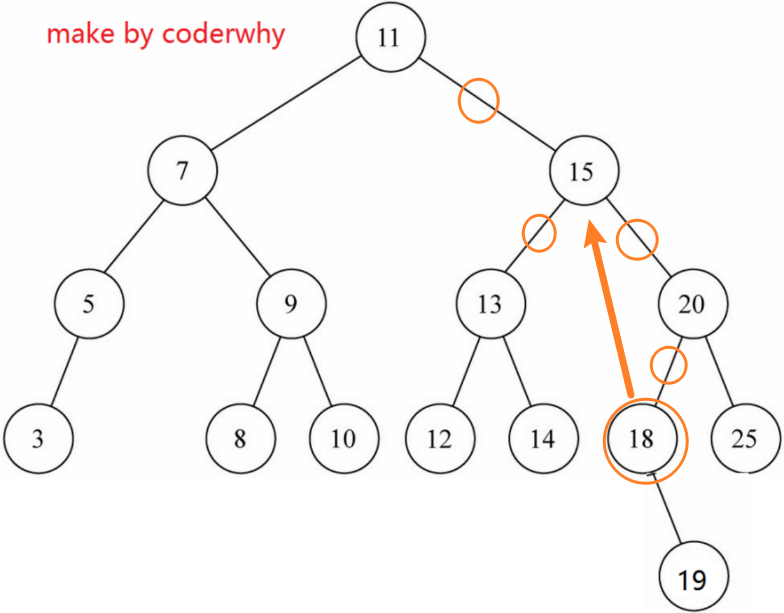
BSTree:
import Node from "../types/Node";

import { btPrint } from 'hy-algokit'

export class TreeNode<T> extends Node<T> {
  left: TreeNode<T> | null = null
  right: TreeNode<T> | null = null

  parentNode: TreeNode<T> | null = null

  get isLeft(): boolean {
    return !!(this.parentNode && this.value < this.parentNode.value)
  }

  get isRight(): boolean {
    return !!(this.parentNode && this.value > this.parentNode.value)
  }
}

// BinarySearchTree
export class BSTree<T> {
  protected root: TreeNode<T> | null = null

  // 打印
  print() {
    btPrint(this.root)
  }

  protected createNode(value: T) {
    return new TreeNode(value)
  }

  // 具体检查平衡,在子类中实现
  protected checkBalance(node: TreeNode<T>, isAdd: boolean = true) { }

  // 二叉搜索树插入节点
  insert(value: T) {
    // 创建树节点
    const newNode = this.createNode(value)

    if (!this.root) {
      this.root = newNode
    } else {
      this.insertNode(this.root, newNode)
    }

    // 模板模式实现父类调子类方法
    this.checkBalance(newNode)
  }

  // 根据根节点和新节点插入树
  private insertNode(node: TreeNode<T>, newNode: TreeNode<T>) {

    // 1. 循环实现
    // let temp: TreeNode<T> | null = node
    // while (temp) {
    //   if (temp.value > newNode.value) { // 去左边
    //     temp.left ? temp = temp.left : (() => { temp.left = newNode; temp = null })()
    //   } else { // 去右边
    //     temp.right ? temp = temp.right : (() => { temp.right = newNode; temp = null })()
    //   }
    // }

    // 递归实现
    if (newNode.value < node.value) { // 去左边
      !node.left ? (() => { node.left = newNode; newNode.parentNode = node })() :
        this.insertNode(node.left, newNode)
    } else { // 去右边
      !node.right ? (() => { node.right = newNode; newNode.parentNode = node })() :
        this.insertNode(node.right, newNode)
    }
  }

  // 搜索节点
  private searchNode(value: T): TreeNode<T> | null {
    if (!this.root) return null

    let temp: TreeNode<T> | null = this.root
    let parent: TreeNode<T> | null = null
    while (temp) {
      if (temp.value === value) return temp

      parent = temp // 获取到父节点
      if (temp.value > value) {
        temp = temp.left
      } else {
        temp = temp.right
      }
      if (temp) temp!.parentNode = parent
    }

    return null
  }

  // 先序/前序遍历
  preOrderTraverse(tree?: TreeNode<T> | null) {
    // 递归实现前序遍历
    if (this.root === null) return
    if (!tree) tree = this.root // 默认取root
    console.log(tree?.value)
    if (tree.left !== null) this.preOrderTraverse(tree.left)
    if (tree.right !== null) this.preOrderTraverse(tree.right)
  }
  // 中序遍历
  inOrderTraverse(tree?: TreeNode<T> | null) {
    // 递归实现中序遍历
    if (this.root === null) return
    if (!tree) tree = this.root // 默认取root
    if (tree.left !== null) this.preOrderTraverse(tree.left)
    console.log(tree?.value)
    if (tree.right !== null) this.preOrderTraverse(tree.right)
  }
  // 后序遍历
  postOrderTraverse(tree?: TreeNode<T> | null) {
    // 递归实现后序遍历
    if (this.root === null) return
    if (!tree) tree = this.root // 默认取root
    if (tree.left !== null) this.preOrderTraverse(tree.left)
    if (tree.right !== null) this.preOrderTraverse(tree.right)
    console.log(tree?.value)
  }
  // 层序遍历
  levelOrderTraverse() {
    if (this.root === null) return
    // 使用数组代替队列效果,先入根节点,
    const valuesArr: TreeNode<T>[] = [this.root] // 默认取root

    while (valuesArr.length) {
      console.log(valuesArr[0].value)
      if (valuesArr[0].left) valuesArr.push(valuesArr[0].left)
      if (valuesArr[0].right) valuesArr.push(valuesArr[0].right)
      // 移除节点前,将子节点入队
      valuesArr.shift()
    }
  }
  // 最大值
  getMaxValue(): T | null {
    if (!this.root) return null
    let temp = this.root
    while (temp.right) { temp = temp.right }
    return temp.value
  }
  // 最小值
  getMinValue(): T | null {
    if (!this.root) return null
    let temp = this.root
    while (temp.left) { temp = temp.left }
    return temp.value
  }
  // 搜索值是否存在
  getValueExist(value: T): boolean {
    return !!this.searchNode(value)
  }
  // 获取节点的后继节点(右子树的最大值(后继)或左子树的最小值(前驱))
  private getSuccessor(delNode: TreeNode<T>): [TreeNode<T>, TreeNode<T>] {
    let current: TreeNode<T> | null = delNode.right
    let successor: TreeNode<T> | null = null
    while (current) { // 找前驱的同时将父节点赋值
      successor = current
      current = current.left
      if (current) {
        current.parentNode = successor
      }
    }

    const successorTemp = successor!
    // 后继节点的连右边操作
    if (successor !== delNode.right) {
      // 后继节点有一个右子树的考虑,后继节点无右子树就相当于删除原二叉树后继节点了,妙
      successor!.parentNode!.left = successor!.right
      // 改变successor右子树前,修改后继节点右子树parent指针指向
      if (successor!.right) { successor!.right.parentNode = successor!.parentNode }
      successor!.right = delNode.right
    }

    // 后继节点的连左边操作 后继节点的左节点必须继承删除节点的左节点
    successor!.left = delNode.left

    // successor放上移除的位置后,改变各个节点的parentNode指针
    if (delNode.parentNode) {
      successor!.parentNode = delNode.parentNode
    }
    if (delNode.left) {
      delNode.left.parentNode = successor
    }
    if (delNode.right && delNode.right !== successor) {
      delNode.right.parentNode = successor
    }

    return [successor!, successorTemp]
  }
  // 删除树节点
  remove(value: T): boolean {
    let current = this.searchNode(value)
    if (!current) return false

    let replaceNode: TreeNode<T> | null = null
    // 删除叶子节点
    if (!current.left && !current.right) {
      replaceNode = null
    }
    // 删除非叶子节点
    // 1. 删除的节点有一个子节点
    // 1.1 只有一个左节点
    else if (current.left && !current.right) {
      replaceNode = current.left
      replaceNode.parentNode = current.parentNode
    }
    // 1.1 只有一个右节点
    else if (current.right && !current.left) {
      replaceNode = current.right
      replaceNode.parentNode = current.parentNode
    }
    // 2. 删除的节点有两个子节点
    else {
      // 找到删除节点的后继节点
      const [successor, successorTemp] = this.getSuccessor(current)
      // console.log(current.value, '后继节点是:', successor!.value)
      replaceNode = successor
      // 记录下successor变换前的位置,方便以此从上找不平衡节点
      current = successorTemp
    }

    if (current === this.root) {
      this.root = replaceNode
    } else if (current.isLeft) {
      current.parentNode!.left = replaceNode
    } else {
      current.parentNode!.right = replaceNode
    }

    // 父节点的处理
    this.checkBalance(current, false)
    // 删除完成后,检查树是否平衡

    return true
  }
}
AVLTreeNode:
import { btPrint } from "hy-algokit";
import { TreeNode } from "./00_二叉搜索树";

export default class AVLTreeNode<T> extends TreeNode<T> {
  left: AVLTreeNode<T> | null = null
  right: AVLTreeNode<T> | null = null
  parentNode: AVLTreeNode<T> | null = null

  // 获取当前节点所在树的高度
  private getHeight(): number {
    const leftNodeHeight = this.left ? this.left.getHeight() : 0
    const rightNodeHeight = this.right ? this.right.getHeight() : 0

    return Math.max(leftNodeHeight, rightNodeHeight) + 1
  }

  // 计算当前节点所在树的平衡因子(左右子树高度差)
  private getBalanceFactor(): number {
    const leftNodeHeight = this.left ? this.left.getHeight() : 0
    const rightNodeHeight = this.right ? this.right.getHeight() : 0

    return leftNodeHeight - rightNodeHeight
  }

  // 获取当前节点所在树的平衡性(权值为-1,0,1才平衡)
  get isBalanced(): boolean {
    const balanceFactor = this.getBalanceFactor()
    return balanceFactor >= -1 && balanceFactor <= 1
  }


  // 寻找高度更高的子节点
  getHigherChildNode(): AVLTreeNode<T> | null {
    const leftNodeHeight = this.left ? this.left.getHeight() : 0
    const rightNodeHeight = this.right ? this.right.getHeight() : 0

    if (leftNodeHeight > rightNodeHeight) return this.left
    else if (rightNodeHeight < rightNodeHeight) return this.right
    return this.isLeft ? this.left : this.right
  }


  // 右旋转实现
  rightRotate() {
    const isLeft = this.isLeft
    const isRight = this.isRight
    // 获取pivot节点
    const pivot = this.left!
    pivot.parentNode = this.parentNode

    // 处理pivot的右节点,作为root的左节点
    this.left = pivot.right
    if (pivot.right) pivot.right.parentNode = this

    // 根节点作为pivot的右节点
    pivot.right = this
    this.parentNode = pivot

    // root的父节点指向pivot
    if (!pivot.parentNode) {
      return pivot
    } else if (isLeft) {
      pivot.parentNode.left = pivot
    } else if (isRight) {
      pivot.parentNode.right = pivot
    }

    return pivot
  }

  // 左旋转实现
  leftRotate() {
    const isLeft = this.isLeft
    const isRight = this.isRight

    // pivot处理
    const pivot = this.right!
    pivot.parentNode = this.parentNode

    // pivot左节点处理
    this.right = pivot.left
    if (pivot.left) pivot.left.parentNode = this

    // root处理
    pivot.left = this
    this.parentNode = pivot

    // pivot父节点处理
    if (!pivot.parentNode) {
      return pivot
    } else if (isLeft) {
      pivot.parentNode.left = pivot
    } else if (isRight) {
      pivot.parentNode.right = pivot
    }

    return pivot
  }
}
AVLTree:
import { btPrint } from "hy-algokit";
import { BSTree, TreeNode } from "./00_二叉搜索树";
import AVLTreeNode from "./03_封装AVLTreeNode(右旋转和左旋转实现)";

class AVLTree<T> extends BSTree<T> {
  protected createNode(value: T): TreeNode<T> {
    return new AVLTreeNode(value)
  }

  // 插入节点后找到不平衡节点(类方法的模板模式),插入只会影响一个节点不平衡
  protected checkBalance(node: TreeNode<T>): void {
    let current = node.parentNode as AVLTreeNode<T>
    while (current) {
      if (!current.isBalanced) {
        console.log(current.value, '不平衡')
        this.rebalance(current)
      }
      current = current.parentNode!
    }
  }

  // 在不平衡节点的基础上,判断不平衡情况,根据进行旋转平衡
  rebalance(root: AVLTreeNode<T>) {
    // 获取不平衡方向上的子节点和孙子节点
    const pivot = root.getHigherChildNode()
    const pivotNext = pivot?.getHigherChildNode()
    // console.log(pivot, pivotNext)

    let resultNode: AVLTreeNode<T> | null = null
    if (pivot?.isLeft) { // L
      if (pivotNext?.isLeft) { // LL
        resultNode = root.rightRotate()
      } else { // LR
        pivot.leftRotate()
        resultNode = root.rightRotate()
      }
    } else { // R
      if (pivotNext?.isRight) { // RR
        resultNode = root.leftRotate()
      } else { // RL
        pivot?.rightRotate()
        resultNode = root.leftRotate()
      }
    }

    // 当root为整个二叉树的根节点时,返回的result已无this.root指向它,所以需单独处理
    if (!resultNode.parentNode) this.root = resultNode
  }
}
红黑树
红黑树(英语:Red–black tree)是一种自平衡二叉查找树,是在计算机科学中用到的一种数据结构
它在1972年由鲁道夫·贝尔发明,被称为“对称二叉B树”,它现代的名字源于Leo J. Guibas和罗伯特·塞奇威克于1978年写的一篇论文
红黑树的特性
红黑树每个节点都是红色或者黑色的
根节点是黑色的
每个叶子结点都是黑色的空节点(NIL节点、空节点)
-
每个红色节点的两个节点都是黑色节点。(从每个叶子到根的所有路径上不能有两个连续的红色节点)
从任意一个节点到其每个叶子结点的所有路径都包含相同数目的黑色节点(重点)
以上五条性质决定了:从根节点到叶子的最长可能路径(红黑交替,头尾为黑色节点),不会超过**最短可能路径(全黑节点)**的两倍长
AVL树和红黑树的比较
◼ AVL树和红黑树的性能对比:
AVL树是一种平衡度更高的二叉搜索树,所以在搜索效率上会更高;
但是AVL树为了维护这种平衡性,在插入和删除操作时,通常会进行更多的旋转操作,所以效率相对红黑树较低;
红黑树在平衡度上相较于AVL树没有那么严格,所以搜索效率上会低一些;
但是红黑树在插入和删除操作时,通常需要更少的旋转操作,所以效率相对AVL树较高;
它们的搜索、添加、删除时间复杂度都是O(logn),但是细节上会有一些差异;
◼ 开发中如何进行选择呢?
选择AVL树还是红黑树,取决于具体的应用需求。
如果需要保证每个节点的高度尽可能地平衡,可以选择AVL树。
如果需要保证删除操作的效率,可以选择红黑树。
◼ 在早期的时候,很多场景会选择AVL树,目前选择红黑树的越来越多(AVL树依然是一种重要的平衡树)。
比如操作系统内核中的内存管理;
比如Java的TreeMap、TreeSet底层的源码;
排序算法
计算的时间复杂度:使用大O表示法,也可以实际测试消耗的时间;
内存使用量(甚至是其他电脑资源):比如外部排序,使用磁盘来存储排序的数据;
稳定性:稳定排序算法会让原本有相等键值的纪录维持相对次序;
排序的方法:插入、交换、选择、合并等等;
export function swap(arr: number[], i: number, j: number) {
  let temp = arr[i]
  arr[i] = arr[j]
  arr[j] = temp
}
冒泡排序
将大的数不断向后推
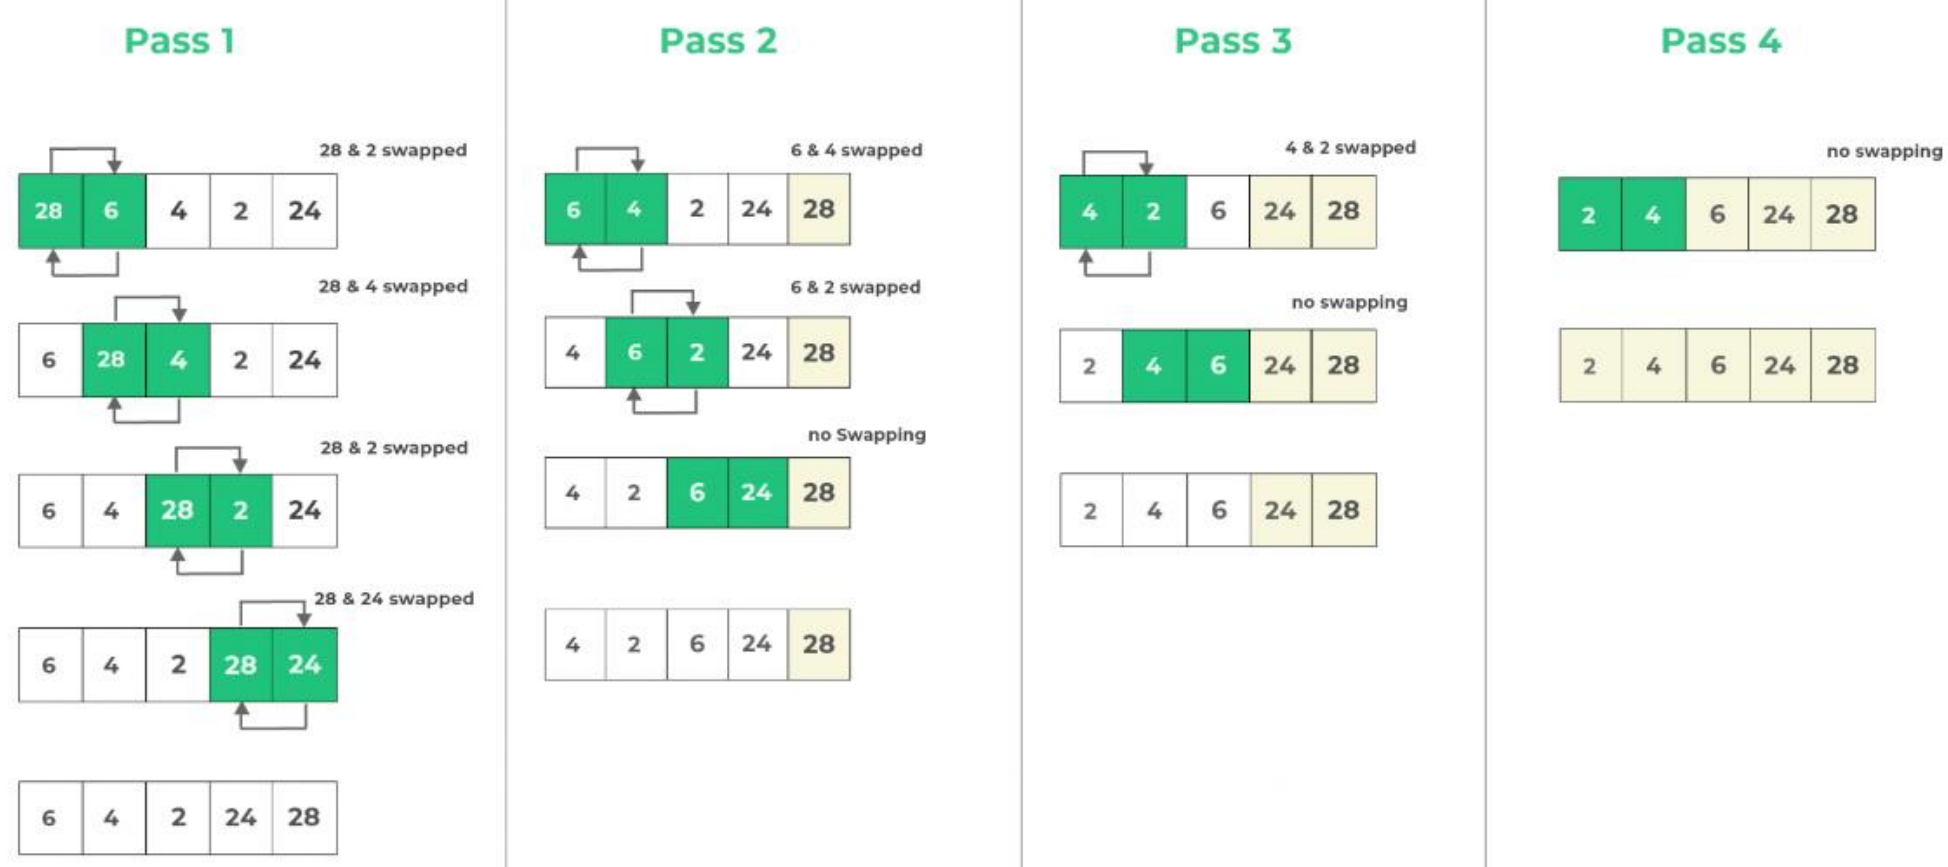
function bubbleSort(arr: number[]) {
  const length = arr.length
  for (let i = 0; i < length - 1; i++) { // length - 1次
    // 优化
    let swapped: boolean = false
    for (let j = 0; j < length - 1 - i; j++) { // 每次减去已排序的i次
      if (arr[j] > arr[j + 1]) {
        swap(arr, j, j + 1)
        swapped = true
      }
    }
    // 已无可交换的数据,跳出
    if (!swapped) break
  }
  return arr
}冒泡排序的时间复杂度主要取决于数据的初始顺序,最坏情况下时间复杂度是O(n^2),不适用于大规模数据的排序
选择排序
找最小,放第一,第二小,放第二...
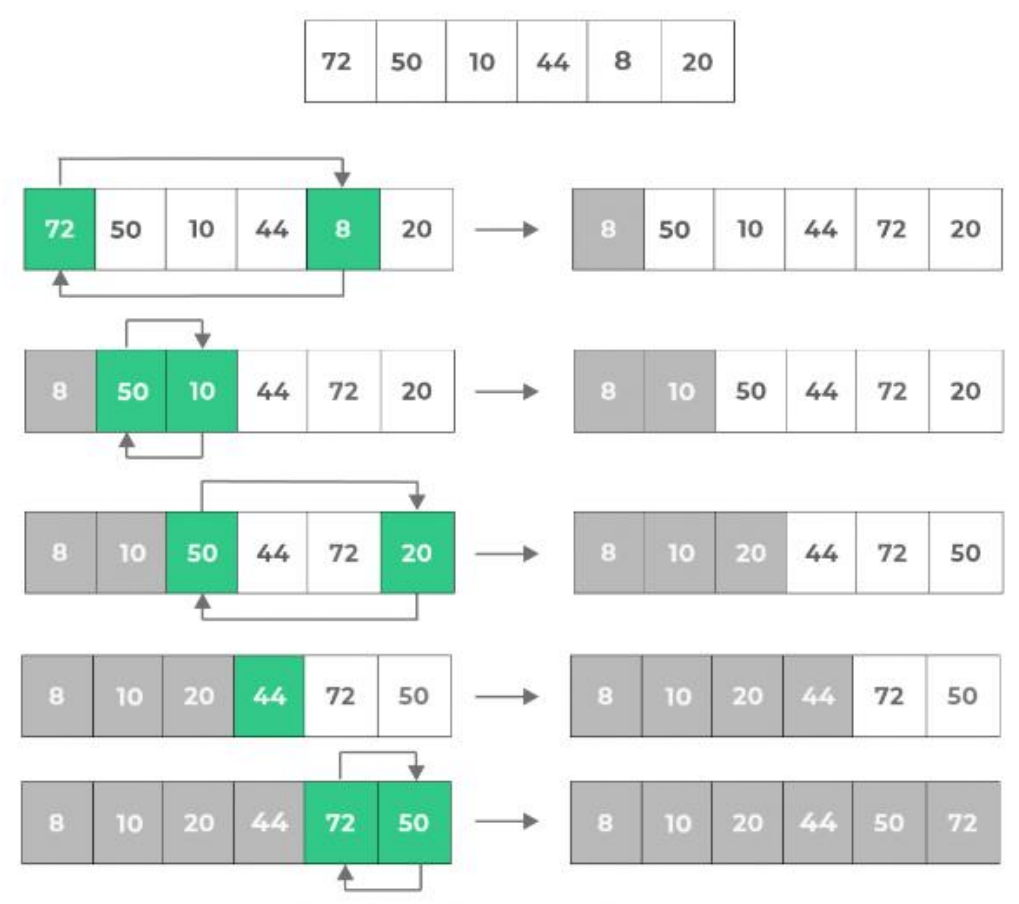
function selectSort(arr: number[]) {
  const length = arr.length
  for (let i = 0; i < length - 1; i++) {
    let min: number = i
    for (let j = i + 1; j < length; j++) {
      if (arr[min] > arr[j]) {
        min = j
      }
    }
    if (i !== min) swap(arr, min, i)
  }
  return arr
}
选择排序平均情况时间复杂度:O(n^2)
插入排序
扑克牌,从左往右不断扩张有序数列,从右往左不断插入牌
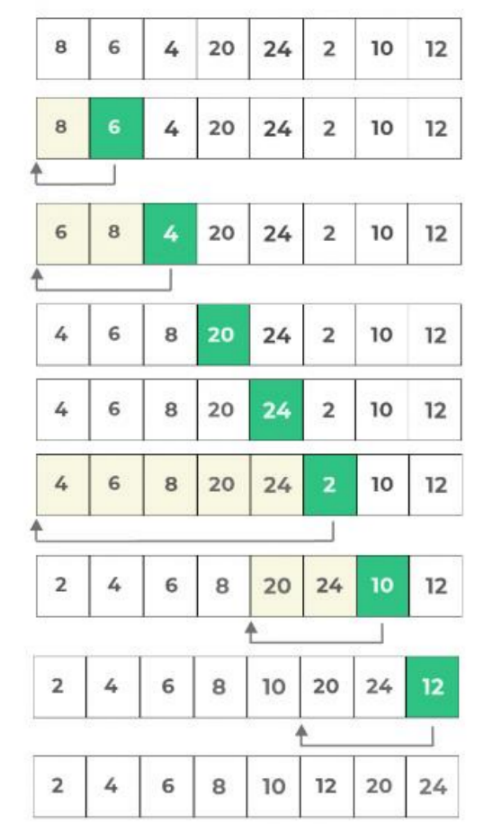
function insertSort(arr: number[]) {
  const length = arr.length
  for (let i = 0; i < length - 1; i++) {
    for (let j = i + 1; j > 0; j--) { // 从右往左插入小的数
      if (arr[j] < arr[j - 1]) {
        swap(arr, j, j - 1)
      } else break // arr[j] >= arr[j - 1],无必要继续往前比较
    }
  }

  return arr
}
插入排序的时间复杂度也为平方级别,即 O(n^2)
归并排序
拆左右两半,合并拆分的有序的两半
function mergeSort(arr: number[]): number[] {
  // 归并递归终止
  if (arr.length <= 1) return arr
  // 拆分
  const length = arr.length
  const midIndex = Math.floor(length / 2)
  const leftArr = arr.slice(0, midIndex)
  const rightArr = arr.slice(midIndex, length)

  // 合并拆分的数组
  return merge(mergeSort(leftArr), mergeSort(rightArr))
}

// 合并函数
function merge(leftArr: number[], rightArr: number[]): number[] {
  let i = 0
  let j = 0
  const newArr: number[] = []
  while (newArr.length !== leftArr.length + rightArr.length) {
    if (i === leftArr.length) { // 左有序数组已用完
      newArr.push(...rightArr.slice(j))
    } else if (j === rightArr.length) { // 右有序数组已用完
      newArr.push(...leftArr.slice(i))
    } else if (leftArr[i] <= rightArr[j]) { // 保证排序的稳定性用 <=
      newArr.push(leftArr[i])
      i++
    } else {
      newArr.push(rightArr[j])
      j++
    }
  }

  return newArr
}

// 合并函数简便写法
function merge(leftArr: number[], rightArr: number[]): number[] {
  const newArr: number[] = []

  while (leftArr.length && rightArr.length) {
    if (leftArr[0] <= rightArr[0]) {
      newArr.push(leftArr.shift()!)
    } else {
      newArr.push(rightArr.shift()!)
    }
  }

  return newArr.concat(leftArr, rightArr)
}
归并排序双指针法(规避大量重复数据的合并引起的性能下降)
function sortArray(nums: number[]): number[] {
  const length = nums.length
  if (length <= 1) return nums

  const midIndex = Math.floor(length / 2)
  const leftArr = nums.slice(0, midIndex)
  const rightArr = nums.slice(midIndex)

  return merge(sortArray(leftArr), sortArray(rightArr))
};

function merge(arr1: number[], arr2: number[]): number[] {
  const newArr: number[] = []
  // 使用指针方式规避大量重复数据的合并引起的性能下降
  let i: number = 0
  let j: number = 0

  while (newArr.length < arr1.length + arr2.length) {
    if (i === arr1.length) {
      newArr.push(...arr2.slice(j))
      break
    }
    if (j === arr2.length) {
      newArr.push(...arr1.slice(i))
      break
    }

    const tempI = i
    const tempJ = j
    while (arr1[i] < arr2[j]) { i++ }
    newArr.push(...arr1.slice(tempI, i))

    while (arr2[j] <= arr1[i]) { j++ }
    newArr.push(...arr2.slice(tempJ, j))
  }

  return newArr
}
归并排序的时间复杂度为 O(nlogn)
快速排序
取标杆,小于标杆放左数组,大于标杆放右数组,最后返回快排左数组连标杆,再连快排右数组
function quickSort(arr: number[]): number[] {
  if (arr.length <= 1) return arr

  // 取标杆
  const midIndex = Math.floor(arr.length / 2)
  // const pivot = arr[midIndex]
  // arr = [...arr.slice(0, midIndex), ...arr.slice(midIndex + 1)]
  const pivot = arr.splice(midIndex, 1)[0]
  const leftArr: number[] = []
  const rightArr: number[] = []

  for (let i = 0; i < arr.length; i++) { // 小放左数组,大放右数组
    if (arr[i] <= pivot) {
      leftArr.push(arr[i])
    } else {
      rightArr.push(arr[i])
    }
  }

  // 快排左连标杆,再连右
  return quickSort(leftArr).concat(pivot, quickSort(rightArr))
}
快排优化(原数组双指针法)
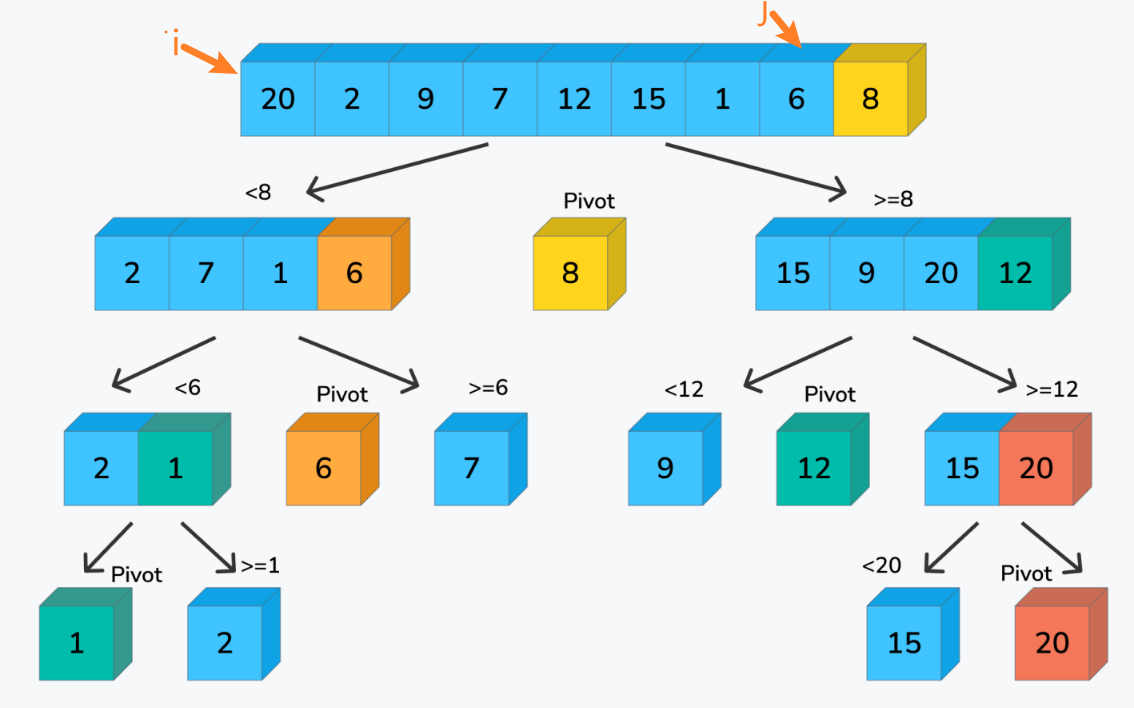
// 原数组快速排序实现
function quickSort(arr: number[]): number[] {
  partition(0, arr.length - 1)
  // 递归函数
  function partition(left: number, right: number) {
    // 递归结束条件
    if (left >= right) return

    let i: number = left
    let j: number = right - 1

    const pivot = arr[right]
    while (i <= j) {
      // 找到小于pivot的直到大于,放到左边
      while (arr[i] < pivot) { i++ }
      // 找到大于pivot的直到小于,放到右边
      while (arr[j] > pivot) { j-- }

      // 此时arr[i] > pivot && arr[j] < pivot || arr[i] === arr[j] === pivot
      if (i < j) {
        swap(arr, i, j)
        i++
        j--
      } else if (i === j) {
        j--
      }
    }

    // 交换i与right位置的值,right值放在中间
    swap(arr, i, right)
    // 继续递归左右两边大小的数组
    partition(left, j)
    partition(i + 1, right)
  }

  return arr
}大多数情况下的时间复杂度为 O(n log n),但在最坏情况下会退化到 O(n^2)
堆排序
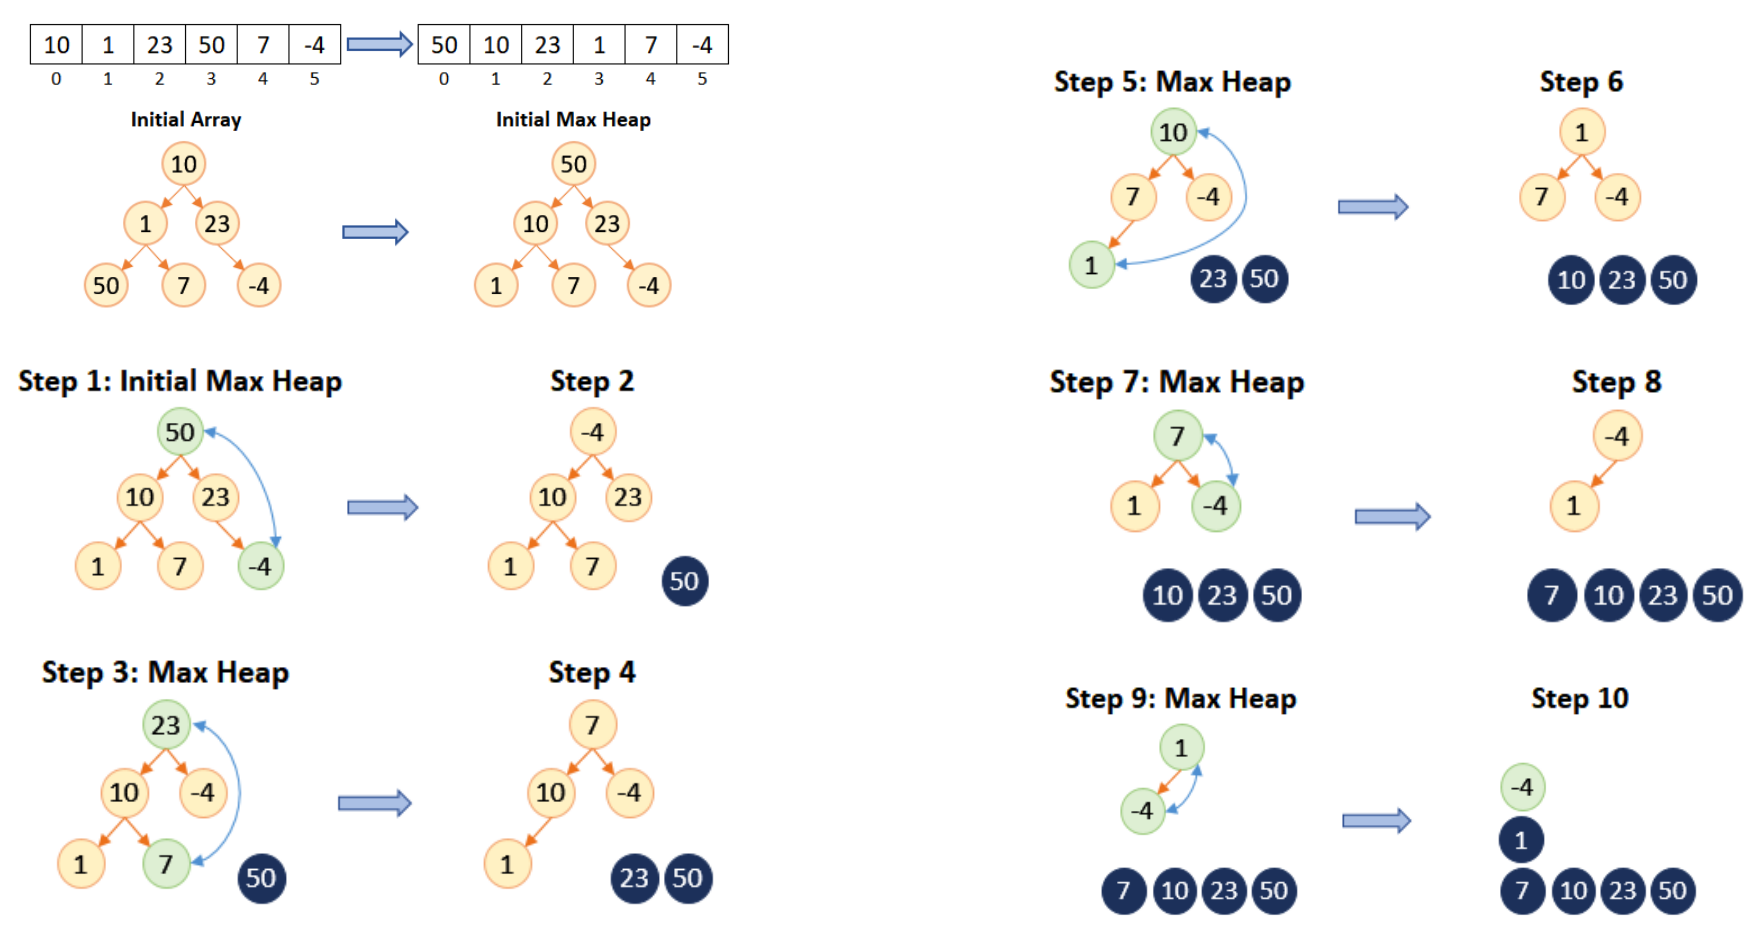
堆排序(Heap Sort),堆排序是一种基于比较的排序算法,它的核心思想是使用二叉堆来维护一个有序序列
二叉堆是一种完全二叉树,其中**每个节点都满足父节点比子节点大(或小)**的条件
在堆排序中,我们使用最大堆来进行排序,也就是保证每个节点都比它的子节点大
实现流程:数组建堆,移头结点,剩余节点继续建堆,移头结点...
// 堆排序
function heapSort(arr: number[]) {
  const length = arr.length

  const newArr: number[] = []
  for (let i = length - 1; i >= 0; i--) {
    // 数组原地建最大堆,将头部最大节点放后面
    arr = buildHeap(arr.slice(0, i + 1))
    newArr.unshift(arr.shift()!)
  }

  return newArr
}

// 数组原地建最大堆
function buildHeap(arr: number[]): number[] {
  const length = arr.length
  // 最后一个非叶子节点的下标
  let notLeafIndex = Math.floor(length / 2) - 1

  while (notLeafIndex >= 0) {
    heapify_down(arr, length, notLeafIndex)
    notLeafIndex--
  }

  return arr
}

// 下滤操作
function heapify_down(arr: number[], length: number, index: number) {
  const leftChildIndex = 2 * index + 1
  const rightChildIndex = 2 * index + 2
  const currentValue = arr[index]

  if (rightChildIndex <= length - 1) { // 有左右节点
    const leftChildValue = arr[leftChildIndex]
    const rightChildValue = arr[rightChildIndex]
    if (leftChildValue >= rightChildValue) { // 左 > 右
      if (leftChildValue > currentValue) {
        swap(arr, leftChildIndex, index)
      } else return
    } else { // 右 > 左
      if (rightChildValue > currentValue) {
        swap(arr, rightChildIndex, index)
      } else return
    }
  } else { // 仅有左节点
    const leftChildValue = arr[leftChildIndex]
    if (leftChildValue > currentValue) {
      swap(arr, leftChildIndex, index)
    } else return
  }
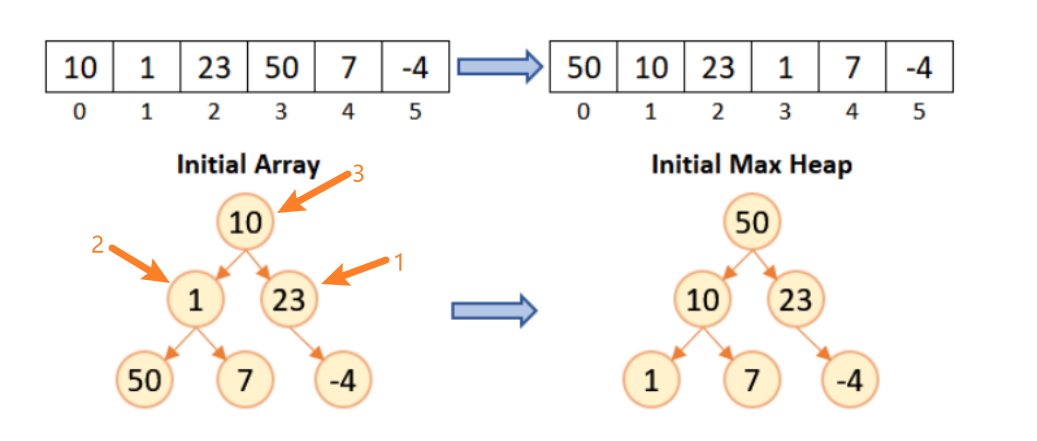
}堆排序优化实现(原数组基础上实现): 完全二叉树最后一个非叶子节点下标为(arr.length / 2) - 1
实现过程:获取最大堆,重复:大值交换放后,最大堆头结点下滤
function heapSort(arr: number[]) {
  const n = arr.length
  // 获取最后一个非叶子结点(arr.length / 2) - 1
  const index = Math.floor((n / 2)) - 1
  // 数组原地建堆(不断下滤的过程)实现最大堆
  for (let i = index; i >= 0; i--) {
    heapifyDown(arr, n, i)
  }

  // 最大值交换放后,arr[0]下滤
  // swap(arr, 0, n - 1)
  // heapifyDown(arr, n-1, 0)

  for (let i = n - 1; i > 0; i--) {
    swap(arr, 0, i)
    heapifyDown(arr, i, 0)
  }

  return arr
}

function heapifyDown(arr: number[], n: number, index: number) {
  // 不断下滤
  while (2 * index + 1 < n) {
    const leftChildIndex = 2 * index + 1
    const rightChildIndex = 2 * index + 2

    // 寻找叶子节点较大的下标
    let largerIndex = leftChildIndex
    if (rightChildIndex < n && arr[rightChildIndex] > arr[leftChildIndex]) {
      largerIndex = rightChildIndex
    }

    // 是否需要交换以及继续下滤
    if (arr[index] >= arr[largerIndex]) {
      break
    }

    swap(arr, index, largerIndex)
    index = largerIndex
  }
}

// console.log(buildHeap(arr))
console.log(heapSort(arr))
// testSort(heapSort)
// measureSort(heapSort)
堆排序时间复杂度:O(nlogn)
希尔排序
在插入排序的基础上,元素往前移动的时候不需要一个个移动所有中间的数据项,就能把较小的数据项移动到左边
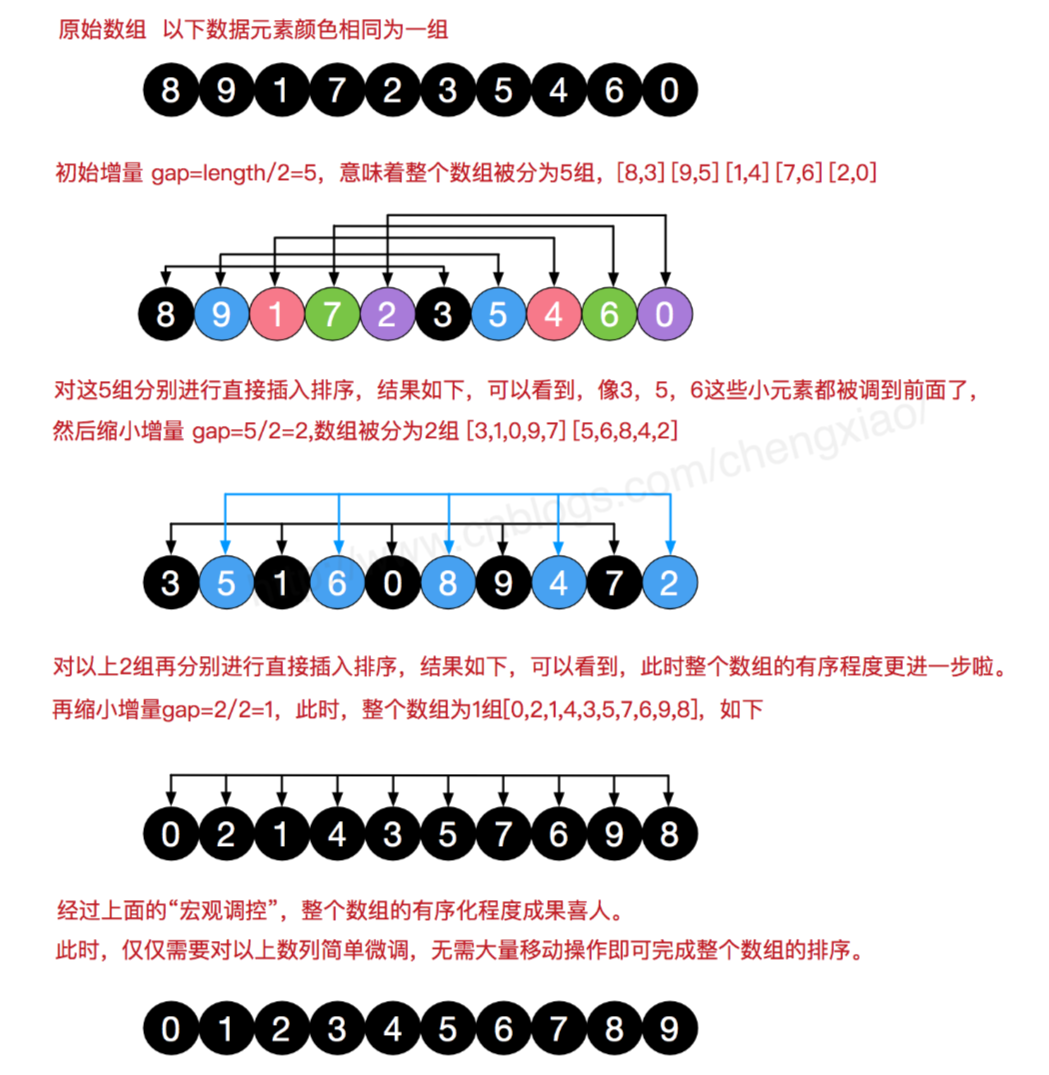
代码展示:
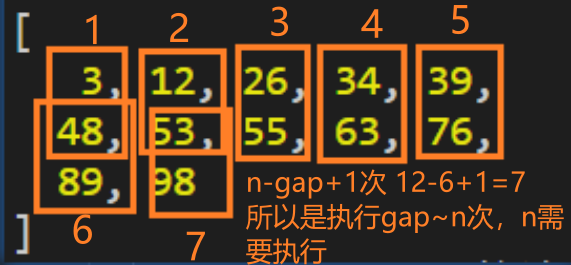
解释:
const arr: number[] = [34, 89, 12, 98, 55, 76, 39, 63, 3, 48, 53, 26]

function shellSort(arr: number[]): number[] {
  const n = arr.length
  if (n <= 1) return arr
  // 选择不同的增量步长gap
  let gap = Math.floor(n / 2)

  while (gap > 0) { // 缩小gap
    // n - gap次插入排序逻辑(由插入排序的n - 1次推出n - gap次)
    for (let i = gap; i < n + 1; i++) {
      for (let j = i; j > gap - 1; j -= gap) {
        if (arr[j] < arr[j - gap]) {
          swap(arr, j, j - gap);
        } else break;
      }
    }

    gap = Math.floor(gap / 2)
  }

  return arr
}

console.log(shellSort(arr))
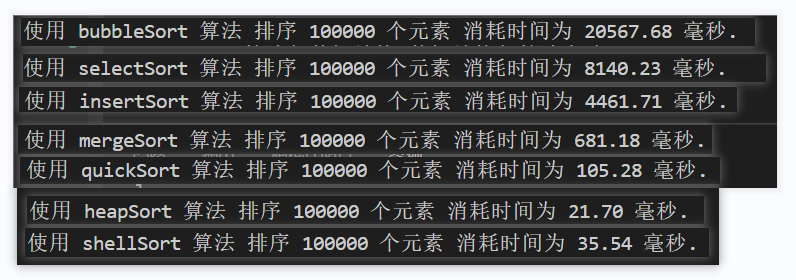
性能测试结果
动态规划DP(Dynamic Programing)
动态规划的名字来源于20世纪50年代的一个美国数学家 Richard Bellman。
他在处理一类具有重叠子问题和最优子结构性质的问题时,想到了一种“动态”地求解问题的方法
通过将问题划分为若干个子问题,并在计算子问题的基础上,逐步构建出原问题的解
先解决小问题,解决小问题过程中发现规律(获取状态转移方程)
步骤重述:
定义状态
dp保留斐波那契数列中每一个位置对应的值(状态)
dp[x]表示的就是x位置对应的状态
设置初始化状态:dp[0]/dp[1]初始化状态
找出状态转移方程:dp[i] = dp[i - 1] + dp[i - 2]
状态转移方程一般都是写在循环中(for/while)
计算结果
斐波那契数列引出动态规划
- 普通递归实现(非常消耗性能,计算慢)
function fib(n: number): number {
  if (n <= 1) return n
  return fib(n - 1) + fib(n - 2)
}

console.log(fib(40))- 记忆化搜索实现(记录计算过的子问题值,重复利用)
function fib(n: number, memo: number[] = []): number {
  if (n <= 1) return n

  if (memo[n]) {
    return memo[n]
  }
  memo[n] = fib(n - 1, memo) + fib(n - 2, memo)

  return memo[n]
}

console.log(fib(50))
动态规划步骤实现斐波那契
- 定义状态
dp保留斐波那契数列中每一个位置对应的值(状态)
dp[x]表示的就是x位置对应的状态
设置初始化状态:dp[0]/dp[1]初始化状态
找出状态转移方程:dp[i] = dp[i - 1] + dp[i - 2]
状态转移方程一般都是写在循环中(for/while)
- 计算结果
function fib(n: number): number {
  // 1.定义状态
  const dp: number[] = []
  // 2.设置初始化状态:dp[0]/dp[1]初始化状态
  dp[0] = 0
  dp[1] = 1
  for (let i = 2; i <= n; i++) {
    // 3.找出状态转移方程:dp[i] = dp[i - 1] + dp[i - 2]
    dp[i] = dp[i - 1] + dp[i - 2]
  }
  // 4.计算结果
  return dp[n]
}
动态规划的状态压缩
由于斐波那契数列的值只跟前两个数值有关
function fib(n: number): number {
  // 1.定义状态 2.设置初始化状态
  let prev = 0
  let cur = 1

  for (let i = 2; i <= n; i++) {
    // 3.找出状态转移方程
    const newValue = prev + cur
    prev = cur
    cur = newValue
  }

  // 4.计算结果
  return n === 0 ? 0 : cur
}
总结
动态规划算法可以看作是记忆化搜索的一种扩展,它通常采用自底向上的方式计算子问题的结果,并将结果保存下来以便后续的计算使用。
动态规划的实现关键在于对子问题结果状态的保存和合理利用
对于上述的斐波那契数列问题来说,我们采用自底向上的方式计算子问题的结果,确保状态转移方程 dp[i-1] 和 dp[i-2] 的值已经计算出来了,才能计算 dp[i] 的值。
先解决小问题,解决小问题过程中发现规律
步骤重述:
定义状态
dp保留斐波那契数列中每一个位置对应的值(状态)
dp[x]表示的就是x位置对应的状态
设置初始化状态:dp[0]/dp[1]初始化状态
找出状态转移方程:dp[i] = dp[i - 1] + dp[i - 2]
状态转移方程一般都是写在循环中(for/while)
计算结果
买卖股票的最佳时机
动态规划实现
function maxProfit(prices: number[]): number {
  const n = prices.length
  if (n <= 1) return 0
  // 定义状态初始化状态存储当天卖出的最大收益
  const dp: number[] = []
  dp[0] = 0
  // 状态转移方程 dp[i] =
  let minPrice = prices[0]
  for (let i = 1; i < n; i++) {

    dp[i] = Math.max(prices[i] - minPrice, dp[i - 1])
    minPrice = Math.min(minPrice, prices[i])
  }
  // 计算结果
  return dp[n - 1]
};
console.log(maxProfit([7, 1, 5, 3, 6, 4]))
状态压缩
由于当前天的最大利润只跟之前天计算的最大利润有关
function maxProfit(prices: number[]): number {
  const n = prices.length
  if (n <= 1) return 0
  // 定义状态初始化状态存储当天卖出的最大收益
  // i位置的值之和前一个位置有关系
  // const dp: number[] = []
  // dp[0] = 0
  let prev: number = 0
  // 状态转移方程 dp[i] =
  let minPrice = prices[0]
  for (let i = 1; i < n; i++) {
    // dp[i] = Math.max(prices[i] - minPrice, dp[i - 1])
    prev = Math.max(prices[i] - minPrice, prev)
    minPrice = Math.min(minPrice, prices[i])
  }
  // 计算结果
  return prev
};
console.log(maxProfit([7, 1, 5, 3, 6, 4]))
最大子数组和
动态规划写法
function maxSubArray(nums: number[]): number {
  const n = nums.length
  // 初始化状态
  const dp: number[] = [nums[0]]

  for (let i = 1; i < n; i++) {
    // 状态转移方程判断是否要加上dp[i - 1]
    dp[i] = Math.max(nums[i], nums[i] + dp[i - 1])
  }

  return Math.max(...dp)
};
状态压缩
function maxSubArray(nums: number[]): number {
  const n = nums.length
  // 初始化状态
  // const dp: number[] = [nums[0]]
  let prev = nums[0]
  let max = nums[0]

  for (let i = 1; i < n; i++) {
    // 状态转移方程判断是否要加上dp[i - 1]
    // dp[i] = Math.max(nums[i], nums[i] + dp[i - 1])
    prev = Math.max(nums[i], nums[i] + prev)
    max = Math.max(prev, max)
  }

  return max
};
不同路径
求一个坐标对应的值,先求该坐标左边的值,再求该坐标上边的值进行相加
动态规划实现
function uniquePaths(m: number, n: number): number {
  // 创建状态
  const dp: number[][] = new Array<number[]>(new Array<number>())
  for (let i = 0; i < m; i++) {
    dp[i] = new Array<number>(n)
  }
  // 初始化状态 dp[0][0]为1 靠边的也都为1
  dp[0][0] = 1
  for (let i = 1; i < m; i++) { dp[i][0] = 1 }
  for (let i = 1; i < n; i++) { dp[0][i] = 1 }

  // 状态转移方程
  for (let i = 1; i < m; i++) {
    for (let j = 1; j < n; j++) {
      dp[i][j] = dp[i - 1][j] + dp[i][j - 1]
    }
  }

  // 返回结果
  return dp[m - 1][n - 1]
};
LC总结方法
刷算法注重的是过程、思路和方法,而不是注重结果
链表
头部的虚拟节点
第n:同间距指针
二维数组创建(Array.from)
// 第一种方式创建的二维数组其子元素是相同地址的(错误方式)
const dp1 = new Array<number[]>(m).fill(Array<number>(n).fill(0))
// 正确创建二维数组并初始化的方式
const dp2 = Array.from({ length: m }, () => {
  return Array(n).fill(0)
})